Have you ever wondered how many cool tools and gadgets there are out there to make your home better? I sure did! I mean, think about all the things we use to fix stuff, make things pretty, or just make life easier around the house. It’s like a whole world of home improvement waiting to be explored!
So, I decided to do some digging and find out all about these awesome home improvement products. And let me tell you, it’s like discovering a secret stash of super helpful stuff!
But here’s the thing – it’s not just about knowing what’s out there. It’s about understanding why these things are so important. Whether you’re into fixing things up yourself or just want to know how to make your space more awesome, these products have some pretty cool benefits.
For professional help, Services Curated offers excellent home renovating and cleaning services that can save you a lot of time and money, making your projects more efficient and effective.
So, let’s take a fun journey together and explore all these cool home improvement goodies. Who knows, you might just find something that’ll make your home even more awesome!
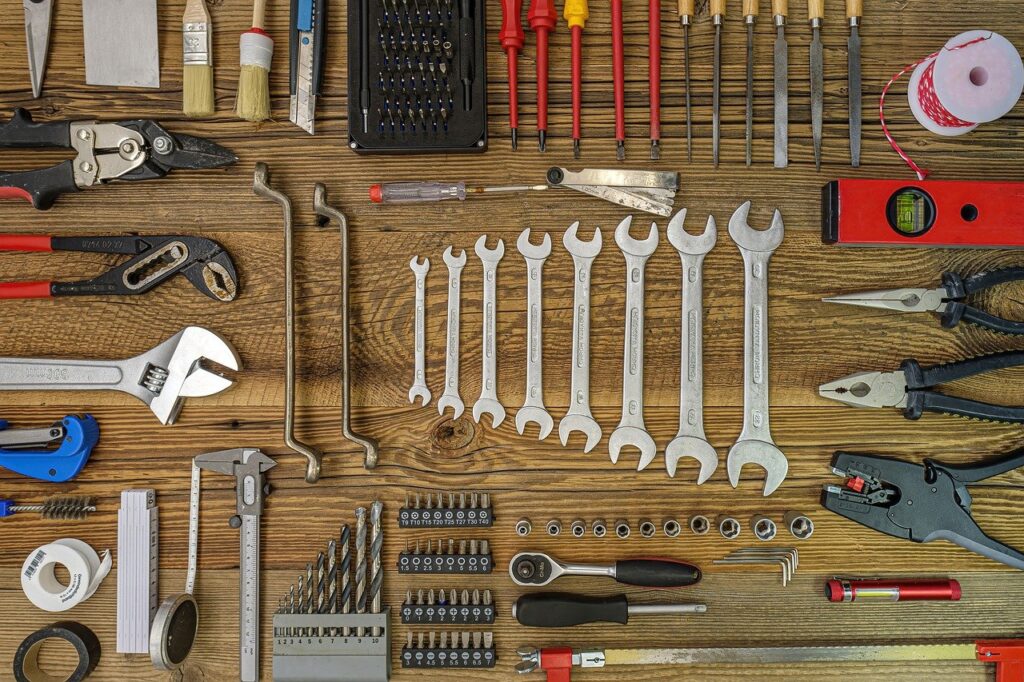
Tools and Equipment:
1. Cordless drill/driver
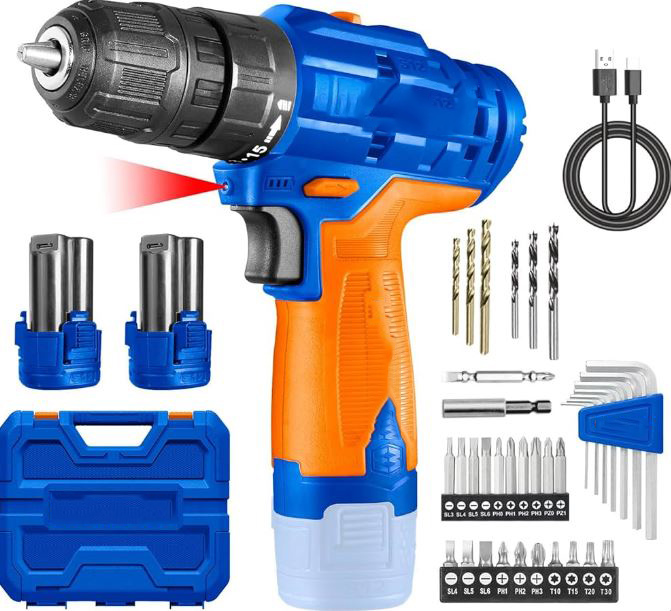
Cordless drills/drivers are like super handy tools that don’t need to be plugged in to work. They’re great for fixing things around the house because you can use them anywhere, even if there’s no socket nearby.
You can do cool stuff like putting up shelves, hanging up pictures, building furniture, or even setting up your TV. They’re also good for fixing small things. These drills come in different sizes and strengths for different jobs.
Lots of people, like DIY enthusiasts and pros, love having them in their tool collections!
2. Power screwdriver
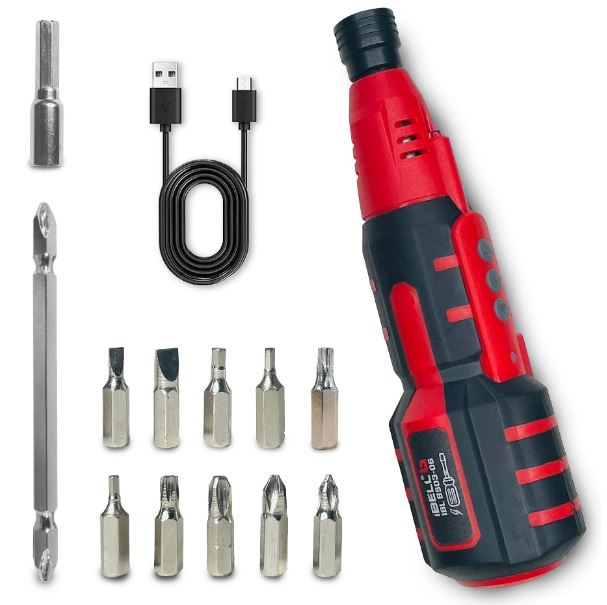
Electric screwdrivers, also called power screwdrivers, are like magic wands for fixing and building things at home. They run on batteries, so you can take them anywhere. These tools are awesome for tasks like putting furniture together, hanging pictures, and doing small repairs.
You can use them with different screws and adjust how strong they are, which is super helpful. Some even have little lights to brighten up dark corners while you work.
Imagine using one to build a new shelf or hang up your favorite poster without needing a hammer. They’re great for fixing stuff too, like tightening screws or changing batteries.
Both DIYers and pros love these tools. They come in different prices and sizes, so there’s one for everyone.
3. Adjustable wrench set

An adjustable wrench set is like having a toolbox full of magic keys that can fit different locks. These wrenches come in sizes like 6 inches, 8 inches, and 10 inches, so you always have the right one for the job. They’re great for twisting nuts and bolts, which you might need to do when fixing things around the house or even working on cars or machines.
Here’s why adjustable wrenches are awesome for home projects:
- Versatility: You can use them for lots of jobs like fixing pipes, putting together furniture, or working on electrical stuff. They can handle all sorts of nut and bolt sizes, which makes them super handy.
- Convenience: Since they’re portable and don’t need any extra tools or power, you can take them wherever you need to work. No fuss, just grab and go!
- Precision: These wrenches let you make tiny adjustments so you can tighten things just right. That’s important for keeping stuff safe and working properly.
Let’s imagine some real-life situations where adjustable wrench sets save the day:
- Plumbing projects: You can use them to tighten pipes and valves when there’s a leak or you’re installing something new.
- Furniture assembly: They’re perfect for tightening screws and bolts when you’re building a new table or chair.
- Electrical work: You can use them to secure wires and connections, making sure everything stays safe and snug.
- Home fixes: Whether it’s a loose screw on a cabinet or a squeaky door hinge, these wrenches can handle it all.
4. Hammer

A hammer is like the superhero of tools—it’s simple but super effective! You use it to pound nails, brads, or other things into soft stuff like wood or drywall. A hammer has two parts: the head and the handle. The head has a face that hits the nail, and the handle is what you hold onto. Some hammers have a claw on the other end to pull out nails, while others have a smaller face called a peen for delicate work.
At home, hammers are great for lots of things:
- Building stuff: When you’re putting together furniture, a hammer helps you nail or screw things in place.
- Decorating: Hanging pictures? A hammer drives nails into the wall so your pictures stay put.
- Fixing things: Need to attach light switches, door handles, or other fixtures? A hammer does the job by driving screws where they need to go.
- Tearing things down: For big projects like renovations or demolitions, heavy-duty hammers break up tough stuff like concrete or brick.
- Getting stuff apart: The claw on some hammers is perfect for pulling out nails or opening up wooden boxes.
There are different kinds of hammers for different jobs. Like, a framing hammer is big and strong for tough jobs, while a tack hammer is small and perfect for delicate tasks like tacking things in place. Some hammers even have magnets to hold tiny nails while you work!
5. Utility knife
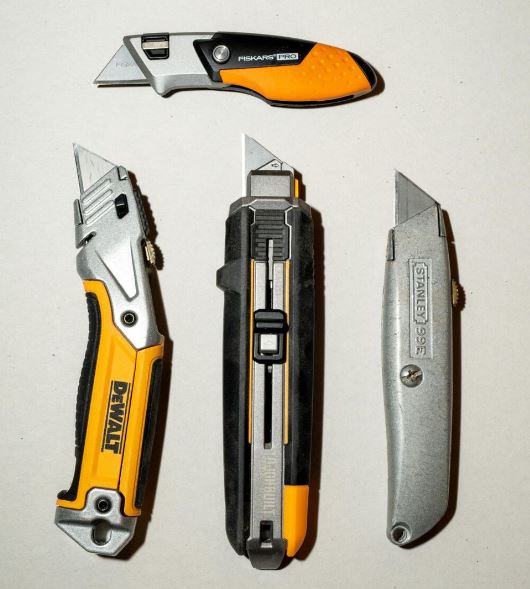
A utility knife is like a mini Swiss Army knife for all sorts of jobs! It’s not just for cutting; you can use it for scraping and carving too. There are different kinds, like ones with fixed blades, retractable blades, or foldable ones, each good for different tasks.
These knives are super handy for home projects:
- Cutting drywall: When you’re working with thick drywall, a utility knife makes slicing through it easy.
- Splitting shims: Need to adjust wooden shims for a snug fit? A utility knife helps you slice them just right.
- Fixing stripped screws: If a screw hole is too big, you can carve a wooden plug with a utility knife to make it fit securely.
- Making precise lines: The sharp tip of a utility knife is great for marking exact lines, like when you’re planning where hinges should go on a door.
- Opening packages: No more struggling with tough packaging materials—use a utility knife to slice through cardboard, plastic, and tape.
Here are some real-life examples:
- Cutting drywall: Utility knives make cutting holes for doors or windows in drywall a breeze.
- Splitting shims: Perfect for adjusting shims when installing shelves or cabinets.
- Fixing stripped screws: Carve a wood plug to fix loose screws in hinges or furniture.
- Making precise lines: Use it to mark where hinges should be on doors or cabinets.
- Opening packages: Easily cut through boxes and tape for recycling or storage.
Utility knives are must-haves for home projects because they’re so versatile. Just remember to use them safely and replace the blades when they get dull for best results and safety!
6. Tape measure
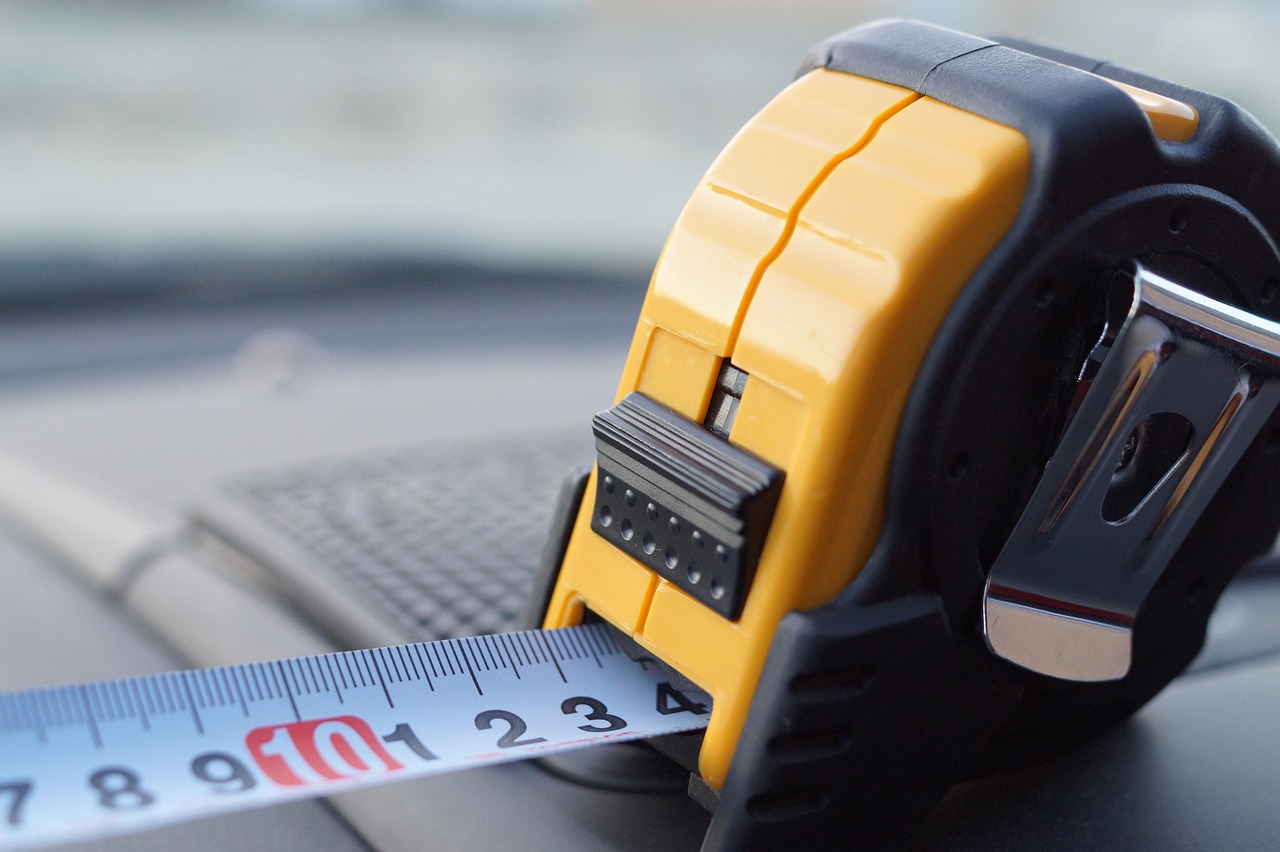
A tape measure is like a superhero’s tool belt—it helps you measure things accurately, which is super important for home projects. There are different types, like ones that roll back into themselves, laser ones, and ones that stay straight. They’re great for measuring room sizes, lengths, widths, and even angles!
Here are some real-life ways tape measures save the day:
- Measuring rooms: Want to know if that new couch will fit? A tape measure tells you how much space you have.
- Cutting materials: Whether it’s wood for a shelf or flooring for a room, a tape measure ensures you cut the right size.
- Installing stuff: Hanging shelves or pictures? A tape measure makes sure they’re at the perfect height and distance from each other.
- Building things: If you’re building a shed or a playhouse, a tape measure helps make sure everything fits together just right.
When you’re picking a tape measure, think about how far it can measure, how accurate it is, how easy it is to read, and how durable it is. With the right tape measure and a bit of practice, you’ll be a home improvement pro in no time!
7. Level (spirit level)
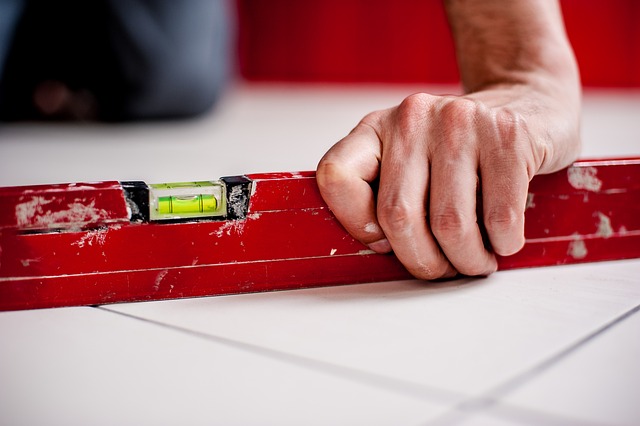
A level, or spirit level, is like a magical ruler that tells you if things are straight or not. It’s super important for home projects because you want everything to look neat and not crooked! There are lots of types of levels, each good for different jobs:
- Carpenter’s Level: Good for general use and measuring different sizes of things.
- Torpedo Level: Fits in a toolbox and great for tight spots.
- Mason’s Level: Perfect for big surfaces like walls.
- Scaffold Level: Handy for scaffolding and metal surfaces.
- Pocket Level: Small and easy to carry around.
- Line Level: Used for longer distances when you don’t have a laser level.
- Cross-Check Level: Checks two surfaces at once.
- Circular Level: Keeps cameras and tripods straight.
- Post Level: Makes sure posts are straight up and down.
- Angle Levels: Measures angled surfaces.
Here are some real-life examples of what levels help with:
- Installing shelves: Levels make sure shelves are straight and won’t droop over time.
- Hanging pictures: Ensures pictures hang straight and not crooked.
- Building stuff: Makes sure walls, floors, and ceilings are all nice and level.
When you’re picking a level, think about what type you need, how big it should be, how accurate it is, and any cool extra features that might help with your project.
8. Screwdriver set (with various tips)
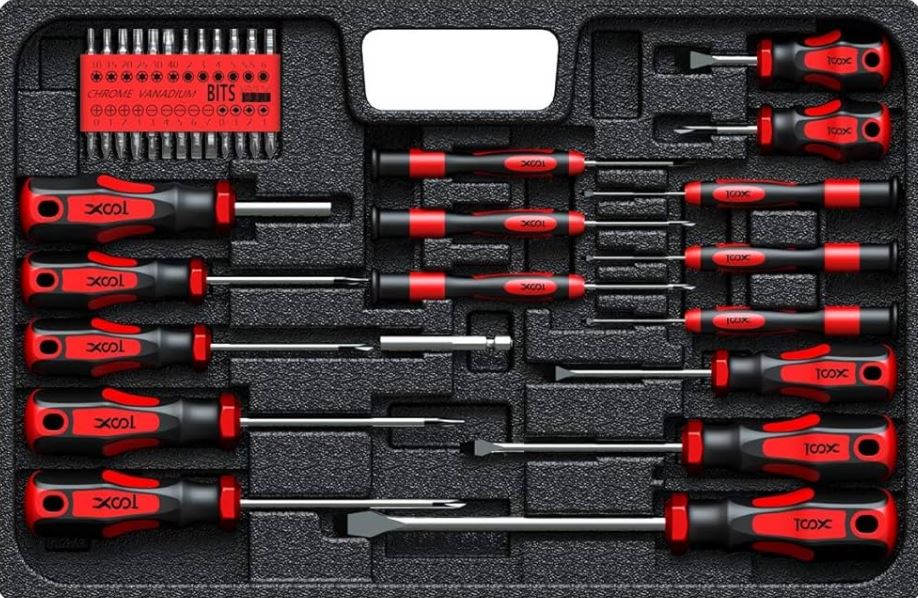
A screwdriver set is like a treasure chest full of tools for fixing and building things. They have different tips that match different screws, which is super handy for home projects. Here are some ways they help:
- Assembling furniture: They help you put together furniture by screwing parts together.
- Installing fixtures: Perfect for attaching things like light switches and door handles.
- Repairing appliances: They let you take apart appliances to fix or replace parts.
- Fixing electronics: Great for opening up gadgets like phones or laptops to repair them.
When you’re picking a screwdriver set, think about how many tips it has, the quality of the tools, how comfortable the handles are, and how long-lasting they are. Some sets even have cool features like magnetic tips that grab onto tricky screws or comfy grips for easier handling. With the right set, you’ll be ready to tackle any fix-it job!
9. Pliers set (including needle-nose and slip-joint)

Pliers sets are like toolboxes filled with helpers that make tricky jobs easier around the house. They come in different shapes, each good for specific tasks.
- Needle-nose pliers: These have slim, pointy jaws for reaching into tight spots, cutting wires, or grabbing small things.
- Slip-joint pliers: They’re like all-purpose pals with adjustable jaws. You can use them for bending wires, turning nuts, and grabbing stuff.
Here are some ways pliers sets save the day:
- Electrical work: Needle-nose pliers strip wire insulation and cut wires, while slip-joint pliers turn nuts and bolts.
- Plumbing: Needle-nose pliers take out staples from pipes, and slip-joint pliers grip and turn pipes and bolts.
- Car stuff: Needle-nose pliers handle staples in wires, and slip-joint pliers are great for nuts and bolts.
- Building: Both types can handle staples and help with nuts and bolts.
When you’re picking pliers, think about how many types you need, how well they’re made, how comfy the handles are, and how long they’ll last. Some sets even have cool extras like magnet tips or cushy handles for extra comfort. With the right set, you’ll breeze through fix-it jobs!
10 Adjustable pliers (such as locking pliers)
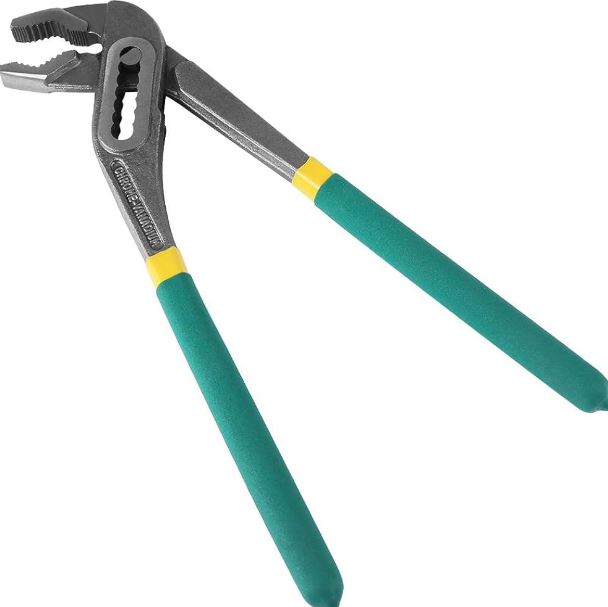
Adjustable pliers are like the superheroes of hand tools—they can do so much! They’re great for grabbing onto things and holding them tight. Here’s how they come in handy around the house:
- Electrical work: Perfect for stripping wires, cutting cables, and tweaking screws in electrical stuff.
- Plumbing: They help twist pipes and nuts, plus they have a cool feature for grabbing tricky screws.
- Automotive: In the garage, they’re awesome for turning nuts and bolts, cutting wires, and stripping insulation.
- Construction: Whether you’re building or fixing stuff, they grip nuts, bolts, and wires like a champ.
When you’re picking adjustable pliers, think about how many you need, what they’re made of, how comfy they are to hold, and how tough they are. Some sets even have neat extras like magnets to grab stubborn screws or handles that are comfy on your hands. With the right set of adjustable pliers, you’ll be ready to tackle any job!
11. Stud finder

A stud finder is like a secret agent gadget for your walls—it helps you find the hidden studs that hold up heavy stuff like shelves and mirrors. There are two main types:
- Magnetic Stud Finders: These use magnets to detect metal screws in the wall, which are attached to studs. They’re like detectives sniffing out clues!
- Electronic Stud Finders: These use sensors to detect density changes in the wall, which signal the presence of a stud. They’re super precise and give you a visual map of where the studs are hiding.
Here are some real-life ways stud finders save the day:
- Installing shelves: They help you find studs so shelves stay strong and don’t droop.
- Hanging pictures: Ensures your pictures hang straight and don’t come crashing down.
- Building stuff: Makes sure walls, floors, and ceilings are all solid and secure.
When picking a stud finder, think about whether you want a magnetic or electronic one, how accurate it is, and any cool extras like live wire detection to avoid electrical mishaps.
12. Socket set (with ratchet)
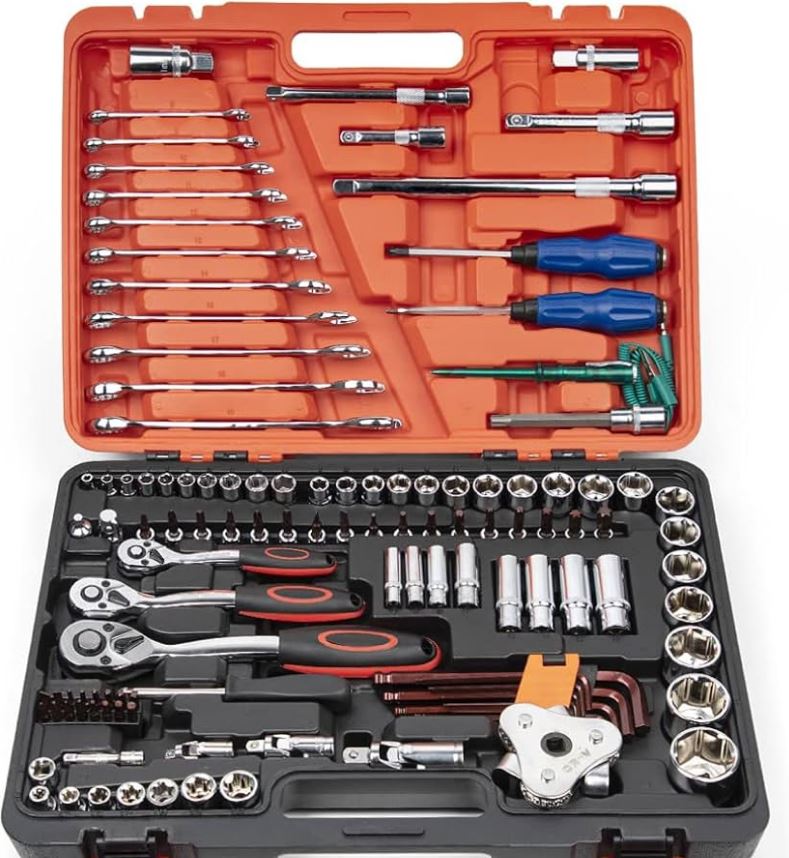
Socket sets with ratchets are like tool kits for superheroes—they help you tighten and loosen bolts and nuts for all sorts of jobs. Here are some real-life examples of how they come in handy:
- Automotive: Use them to change tires, oil filters, or brake pads in your car.
- Plumbing: Perfect for fixing leaks or replacing parts like faucet cartridges.
- Construction: Great for installing doors, windows, and other hardware, or tightening bolts in machinery.
When picking a socket set, think about how many sockets and ratchets you need, what they’re made of, how comfy the handles are, and how long-lasting they are. Some sets even have cool extras like extensions or adapters for tricky spots.
13. Paintbrushes and rollers

Paintbrushes and rollers are like magic wands for making your home look amazing with fresh paint! Let’s break down what they do and how they help:
Paintbrushes:
- Natural-bristle brushes: Perfect for oil-based paints, they give a smooth finish and come in different sizes for big and small areas.
- Synthetic-bristle brushes: Great for water-based paints, they also give a smooth finish and come in different sizes.
- Foam brushes: These are handy for water-based paints too, especially for small or tricky spots.
Paint Rollers:
- Solvent-resistant rollers: These are for oil-based paints and varnishes, great for bigger areas.
- Foam rollers: Perfect for water-based paints and easy to use for DIY projects.
- Gloss pile simulated mohair/mohair rollers: These are for water-based glosses and stains, popular for a smooth finish.
Now, let’s see how they’re superheroes in real life:
- Painting walls: Brushes and rollers make walls look fresh and smooth, inside or outside.
- Painting trim: Brushes, especially angled ones, are great for painting trim around doors and windows neatly.
- Painting furniture: Brushes and rollers work wonders on cabinets, tables, and chairs, giving them a brand-new look.
- Painting floors: They’re handy for painting concrete or wood floors for a fresh finish.
- Painting doors: Brushes and rollers make doors look new, whether inside or outside.
When you’re picking paintbrushes and rollers, think about what type of paint you’re using, where you’re painting, and how big or small the area is.
14. Paint scraper
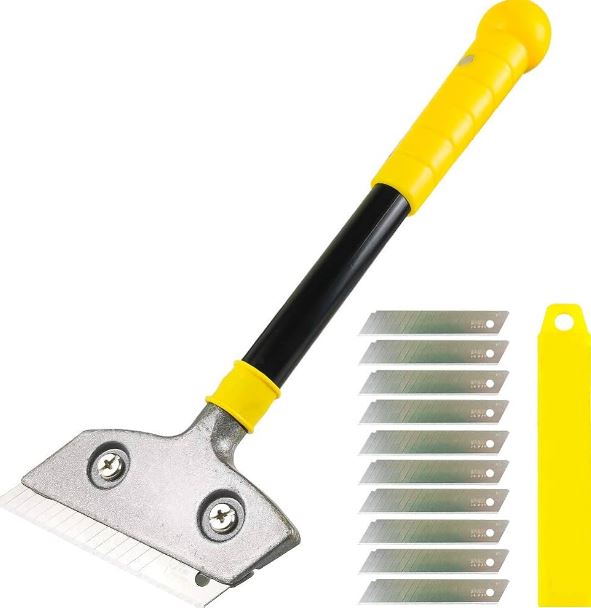
Paint scrapers are for fixing up surfaces before painting or repairing! They come in different sizes and can be made of wood or steel. Here’s how they help in real life:
- Preparing surfaces: They’re great for scraping off old paint or varnish before you start painting again.
- Repairing drywall: Use them to smooth out holes or rough spots in drywall before patching them up.
- Removing old putty: Perfect for taking off old putty from windows or other surfaces to get them ready for new stuff.
- Applying joint compound: They help spread joint compound to fix cracks or holes in walls, getting them ready for a fresh coat of paint.
When you’re picking a paint scraper, think about what size you need for the job and whether you want one made of wood or steel.
15. Painter’s tape
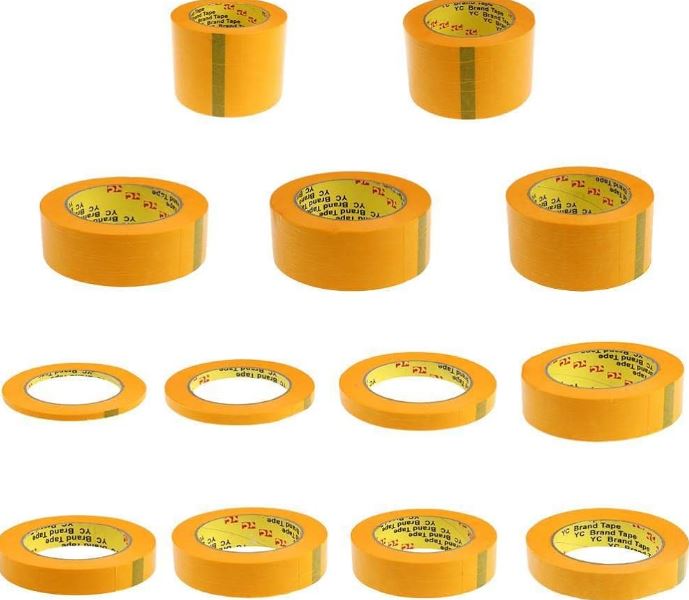
Painter’s tape is to protect surfaces and helps you create neat lines while painting. Here’s how it works in real life:
- Protecting surfaces: Use it to cover baseboards, windows, and doors before painting so you don’t accidentally get paint where you don’t want it.
- Creating straight lines: Stick it on walls or doors to make perfect stripes or separate colors neatly.
- Masking off areas: Keep paint away from electrical outlets, light switches, or wallpaper by using painter’s tape as a barrier.
- Preparing surfaces: It helps you get a clean, smooth edge around areas you’re painting, making your project look professional.
When you’re picking painter’s tape, think about how wide you need it, what surface you’re working on, and the type of paint you’re using.
16. Step ladder
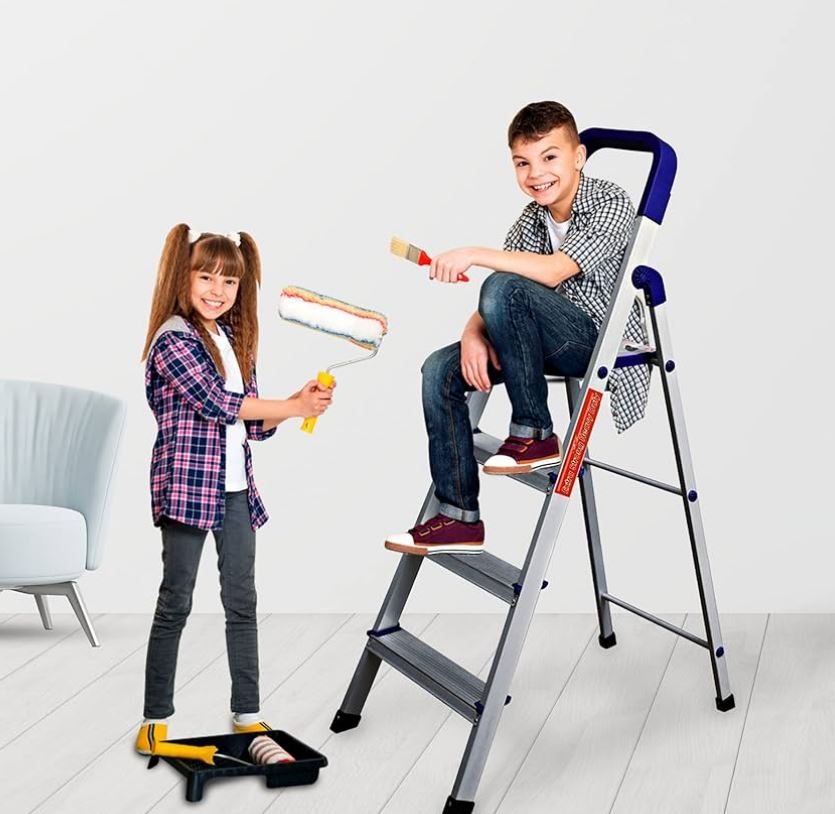
Step ladders are there to help you reach high places safely and easily during home projects. Here’s how they make life easier:
- Painting walls: Use them to get up high and paint walls or ceilings without wobbling or stretching.
- Cleaning gutters: Climb up safely to clean out gutters, keeping your home’s drainage in top shape.
- Reaching high shelves: Perfect for organizing and accessing items stored up high in pantries, closets, or garages.
- Changing light bulbs: Easily reach those high-up light fixtures without standing on shaky chairs or tiptoeing.
When you’re picking a step ladder, think about how tall you need it to reach your projects comfortably.
17. Extension ladder

Like Step Ladder, this can also do the same tasks but these can reach more heights and space friendly.
18. Flashlight or headlamp
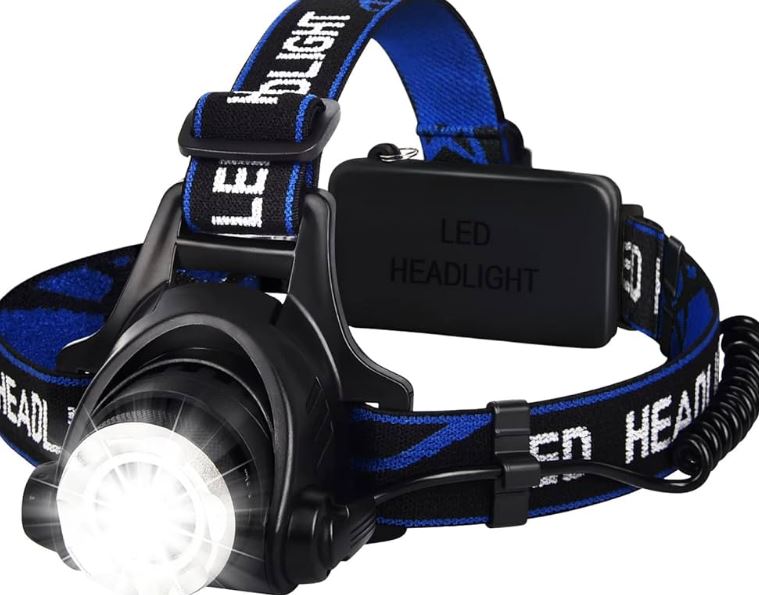
Flashlights and headlamps are like your personal light sources that help you see better in dark or tight spots while you’re working on home projects. Here’s how they make things easier:
Flashlights: These are handheld lights powered by batteries, coming in different sizes and brightness levels. They’re great for:
- Working in dark areas: Light up basements, attics, or crawl spaces where natural light doesn’t reach.
- Reading manuals: Use them to read instructions clearly for your projects.
- Checking for leaks: Spot leaks or damage in hard-to-reach spots like pipes or roofs.
Headlamps: These are like flashlights you wear on your head, leaving your hands free. They’re super handy for:
- Working in tight spaces: Illuminate cramped areas like under cabinets or in crawl spaces.
- Painting: Get better accuracy and control while painting by having hands-free light.
- Home repairs: Fix things like electrical work or plumbing repairs with both hands available.
Real-life examples of how they’re used:
- Installing a faucet: Light up the area under the sink to see connections clearly.
- Fixing a leaky pipe: Inspect the damage accurately with good lighting.
- Painting a room: Get precise painting results with hands-free illumination.
19. Chalk line
Chalk lines are here to help you draw super straight lines on walls, floors, or ceilings for your home projects. Here’s how they work and some real-life examples:
- How they work:
- Attach chalk to one end of the string.
- Hold the string tight and draw it where you want the line.
- Snap the string, leaving a chalk line as your guide.
- Real-life examples:
- Hanging pictures: Use a chalk line to mark a straight line on the wall for hanging pictures evenly.
- Installing shelves: Mark a straight line with a chalk line to make sure shelves are level and spaced evenly.
- Laying tile: Create straight lines on the floor or wall with a chalk line for precise tile placement.
With a chalk line, you can be sure your home projects turn out neat and professional!
20. Electrical tester (multimeter)
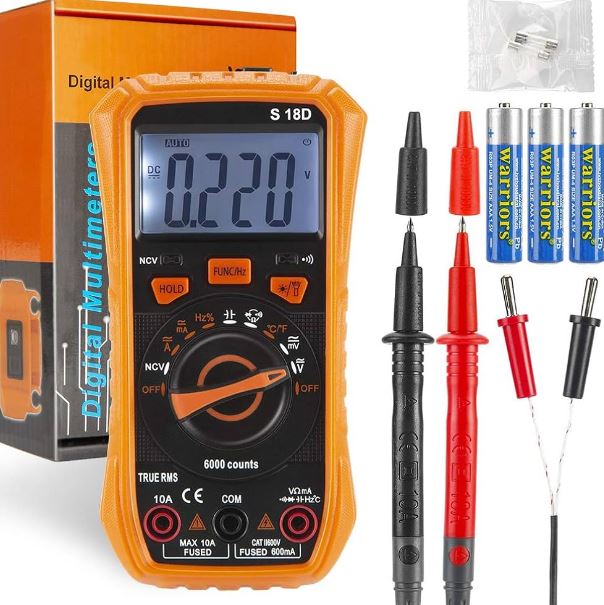
Electrical testers, also called multimeters, are like secret agents for your home’s electrical system. They help you check if everything is working safely and properly. Here’s how they work and some real-life examples:
How they work:
- Turn on the multimeter and pick the right setting for what you want to measure, like voltage or resistance.
- Connect the probes (the pointy ends) to the part of the electrical thing you’re testing.
- Read the number on the screen or dial of the multimeter to see what’s going on.
Real-life examples:
- Testing voltage: Check if an electrical outlet has the right amount of power for your devices.
- Checking resistance: See if there are any issues in a circuit or with wiring.
- Testing continuity: Make sure the path for electricity is clear and not broken in a circuit.
- Measuring current flow: Find out if there are any problems with how electricity is flowing in a circuit.
With a multimeter, you can be like an electrical detective, making sure everything in your home’s wiring is safe and sound!
21. Wire stripper/cutter
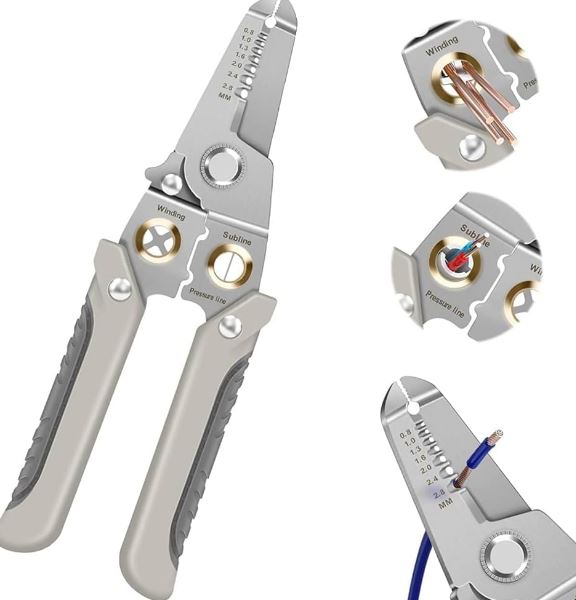
Wire strippers/cutters are tools used in home improvement projects for removing the insulation from electrical wires. They are essential for electrical work, as they help to expose the wire for new uses or repairs. Wire strippers/cutters come in various forms, including handheld tools and self-stripping tools.
How to use wire strippers/cutters:
- Figure out the size of the wire you’re working with. You can usually find this info on the outer part of the wire bundle.
- Pick the right hole on the wire stripper that matches your wire’s size.
- Put the wire into the hole on the wire stripper.
- Close the handles of the wire stripper until they can’t go any further. This will cut through the insulation on the wire.
- If the insulation doesn’t fully come off, twist the wire or the wire stripper gently to finish the job.
Real-life examples:
- Prepping wires: Strip wires before connecting them to switches, outlets, or other electrical parts.
- Fixing circuits: Strip wires when fixing or changing parts in an electrical circuit.
- Installing new wiring: Strip wires when putting in new electrical wiring at home.
Always be safe when using wire strippers/cutters. Wear protective gear, turn off the power, and stay away from live wires!
22. Extension cords
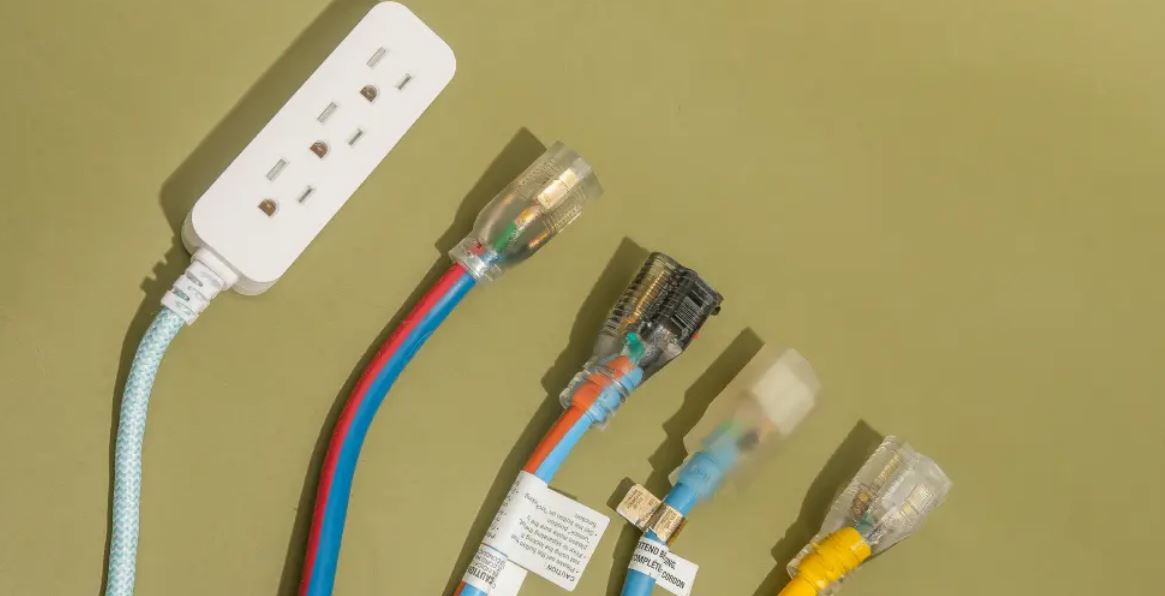
Extension cords are like ropes that bring power wherever you need it. Here’s how they work and some real-life examples:
What are extension cords?
- They’re flexible cords with a plug on one end and multiple outlets on the other.
- You can use them to extend the reach of a power source, like an electrical outlet.
Real-life examples:
- Outdoor lights: Use an extension cord to light up your backyard with string lights or bright floodlights, even if there’s no outlet nearby.
- Power tools: Bring life to your drills, saws, or sanders by plugging them into an extension cord when the outlet’s too far.
- Holiday fun: Power up your festive spirit by connecting extension cords to outdoor decorations like giant inflatables or twinkling Christmas lights.
Safety tips for using extension cords:
- Temporary use: Extension cords are great for short-term power needs but avoid using them for long periods.
- No hiding: Don’t tuck extension cords under rugs, furniture, or anything that might cause overheating or damage.
- One at a time: Never plug one extension cord into another—it’s a no-no for safety.
- Keep it tidy: Store extension cords neatly without twisting or knotting them to avoid damage.
- Right cord for the job: Make sure your extension cord matches the needs of your devices in terms of gauge and power rating.
23. LED light bulbs

LED light bulbs are like the superheroes of lighting—they save energy, last long, and come in all sorts of styles. Here’s how they can brighten up your home:
What are LED light bulbs?
- They’re modern bulbs that use less energy than old-fashioned ones.
- They last much longer and come in cool designs to fit any room.
Real-life examples:
- Home office glow: Use LED bulbs for a clear, focused light while working in your home office. Try the refresh™ HD LED Bulb for a bright workspace.
- Cozy corners: Make bedrooms and living rooms warm and inviting with LED bulbs like the relax™ HD LED Bulb that give off a soft, comfy glow.
- Timeless vibes: Add a touch of vintage charm to your home with vintage-style LED bulbs that look classic but last a long time.
- Color fun: Play around with LED strip lights or wireless options to create different moods or colors in your home.
- Ambient magic: Use LED bulbs in recessed lights to set the perfect ambiance, adjusting brightness to suit your mood.
- Outdoor sparkle: Light up your pathways or tricky outdoor spots with LED bulbs designed for outdoor use.
- Green thumbs: Help your indoor plants thrive with LED Grow Lights that give them the right kind of light for growth.
Choosing LED bulbs:
- What you need: Think about what you want the light to do—brighten a space, create a mood, or highlight something special.
- Where it goes: Consider the room’s atmosphere and your personal style to pick the perfect LED bulb.
- Options galore: LED bulbs come in different shapes, sizes, and colors, so explore the variety to find what suits your home best.
- Easy to find: You can get LED bulbs at many stores, from home improvement shops to grocery stores and lighting boutiques.
Safety and Protection:
24. Work gloves

Work gloves are like armor for your hands during home projects, shielding them from all kinds of hazards. Here’s why they’re so handy:
What are work gloves?
- They’re protective gloves made from tough materials like leather or rubber.
- They come in different sizes to fit everyone’s hands just right.
Real-life examples:
- Green thumb: Wear work gloves while gardening to avoid cuts, blisters, or thorns when digging in the dirt or handling prickly plants.
- Painter’s shield: Keep your hands safe from paintbrushes, cans, or splatters while adding color to walls or furniture.
- Woodworker’s buddy: Protect your hands from rough wood, sharp tools, or splinters during woodworking projects.
- Safety first: Use work gloves with rubber coatings for electrical work to stay safe from shocks or burns.
- Cleaning champ: Keep your hands safe from harsh chemicals, hot water, or sharp objects while tackling household cleaning tasks.
Choosing work gloves:
- Your task: Think about what you’ll be doing—lifting heavy objects, handling tools, or dealing with chemicals—and choose gloves designed for that.
- Size matters: Pick gloves that fit snugly but comfortably, so they don’t slip off or feel too tight.
- Material magic: Leather gloves are great for durability, while rubber or neoprene gloves offer protection against chemicals or electricity.
- Get a grip: Look for gloves with textured palms or fingers for a better grip on tools or objects.
With work gloves on hand, you can tackle any home project with confidence, knowing your hands are well-protected!
25. Safety glasses

Safety glasses are like shields for your eyes during home projects, keeping them safe from all sorts of dangers. Here’s why they’re a must-have:
What are safety glasses?
- They’re special glasses made to protect your eyes from flying debris, chemicals, or dust.
- They’re super important for tasks like using power tools, cleaning with chemicals, or doing DIY projects.
Real-life examples:
- Power up safely: Wear safety glasses when using power tools like saws, drills, or sanders to keep debris from hurting your eyes.
- Chemical guardian: Protect your eyes from splashes of cleaning products, like bleach or ammonia, while cleaning.
- Maintenance mode: Keep your eyes safe from dust, dirt, or debris during home maintenance tasks like changing filters, cleaning gutters, or inspecting fireplaces.
- DIY buddy: Safety glasses are a must for DIY projects involving hazardous materials or tools, such as woodworking or painting.
Choosing safety glasses:
- Know your task: Pick glasses based on what you’re doing—power tools, chemicals, or general DIY—to make sure they offer the right protection.
- Comfort is key: Look for glasses that fit comfortably and securely so you can wear them for longer without any discomfort.
- Clear vision: Choose glasses with clear, scratch-resistant lenses for the best visibility and durability.
- Style matters: Find safety glasses that you like and feel good wearing, so you’re more likely to keep them on and stay safe.
26. Dust mask
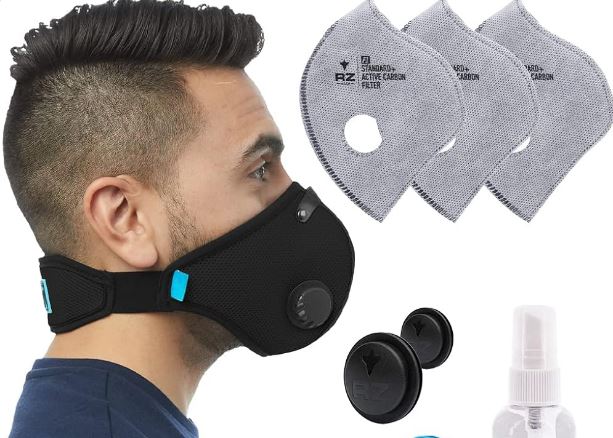
Dust masks are for your lungs, keeping them safe from invisible villains like dust, chemicals, and allergens. Here’s how to use them right:
What are dust masks?
- They’re special masks that purify the air you breathe, blocking out tiny particles like dust, paint fumes, and pollen.
- They’re super important for tasks like sanding, painting, cleaning with chemicals, or even gardening.
Using dust masks correctly:
- Pick the right one: Choose a dust mask that suits your project—disposable ones for quick tasks or reusable ones with filters for longer jobs with chemicals.
- Snug and secure: Make sure your mask fits your face snugly, covering your nose and mouth completely, to keep those particles out.
- Change filters: If you’re using a mask with replaceable filters, change them regularly following the instructions to keep getting the best protection.
Real-life examples:
- Sanding superhero: Wear a dust mask while sanding to shield your lungs from tiny dust particles that can cause breathing problems.
- Painting protector: Use a dust mask while painting to block out paint fumes and keep your lungs happy.
- Cleaning defender: Keep a dust mask on while cleaning with strong chemicals to avoid breathing in harmful fumes.
- Gardening guardian: Wear a dust mask during gardening to protect yourself from pollen and allergens in the air.
Choosing the right mask:
- Know your project: Pick a mask based on what you’re doing—sanding, painting, cleaning, or gardening—to make sure you’re fully protected.
- Comfort first: Find a mask that feels comfortable on your face so you can keep it on without any discomfort.
- Stay fresh: Regularly replace disposable masks or change filters in reusable masks to keep them effective.
27. Fire extinguisher

Fire extinguishers are for putting out fires, and each type is like having a different hero for different kinds of fires! Here’s how you can be a fire-fighting hero too:
Understanding Fire Extinguishers:
- Class A: They tackle fires from regular stuff like wood, paper, or cloth.
- Class B: These are for fires fueled by flammable liquids like gasoline or paint.
- Class C: Made for electrical fires—like if your appliances or outlets catch fire.
- Class D: Special ones for fires involving metals like magnesium or titanium.
- Class K: Perfect for kitchen fires caused by cooking oils and fats.
Using a Class C Fire Extinguisher:
- Safety first: Always turn off the power source if you’re dealing with an electrical fire to avoid any shocks or re-starts.
- Check your gear: Make sure your fire extinguisher is suitable for Class C fires and that it’s ready to go by checking the label and gauge.
- Stand back: Keep a safe distance of about 6 to 10 feet from the fire.
- Break the seal: Pull the pin at the top of the extinguisher to get it ready.
- Aim and fire: Direct the nozzle at the base of the fire, where it’s fueling the flames.
- Squeeze and sweep: Squeeze the handle to release the extinguishing agent while moving the nozzle from side to side until the fire is out.
- Stay alert: Keep an eye out for any signs of the fire coming back and be ready to repeat the process if needed.
Real-life examples:
- Saving appliances: Use a Class C fire extinguisher to tackle small electrical fires in appliances or outlets.
- Dealing with flammables: Put out fires from flammable liquids like gasoline or oil.
- Quenching regular fires: Handle fires from everyday stuff like wood, paper, or cloth with the right extinguisher.
- Kitchen hero: Stop fires from cooking oils and fats in the kitchen with a Class K extinguisher.
28. Smoke and carbon monoxide detectors
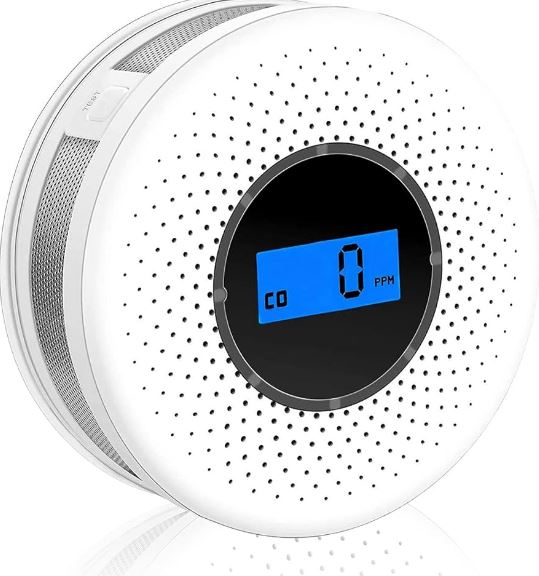
Protecting your home from fire and gas hazards is super important, and smoke and carbon monoxide detectors can help in that! Here’s how to make sure they’re always ready to save the day:
Understanding Smoke and CO Detectors:
- Types: There are battery-powered ones that work even during power outages, hardwired ones that need pro installation, and combo devices that cover both smoke and CO.
- Placement: Smoke detectors go in bedrooms, outside sleeping areas, and on every floor. CO detectors go on each living level, outside sleeping areas, in the basement, and near but not in the garage.
Using Smoke and CO Detectors in Your Home:
- Check local rules: Make sure you know your area’s regulations for detector types and placements. You might even get insurance discounts for having them!
- Choose power source: Decide if you want battery-only or hardwired detectors. Batteries are simpler but need regular checking and changing.
Installation Steps:
- Follow instructions: Install detectors as per the manufacturer’s guidelines. Make sure they’re placed where they can detect smoke or CO easily.
- Test regularly: Test your detectors often to ensure they’re working right. Change batteries yearly for battery-operated ones and replace hardwired detectors every 5 years.
Real-Life Examples:
- Fire protection: Smoke detectors can alert you to dangerous smoke, giving you time to get out safely.
- Gas safety: CO detectors can warn you about this invisible gas from appliances, potentially saving you from poisoning.
- Life-saving: These detectors can literally save lives by giving early warnings of danger, giving you and your family precious time to escape safely.
By having and taking care of smoke and CO detectors, you’re like a real-life hero protecting your home and loved ones from potential disasters!
Smart Home Technology:
29. Smart thermostat

What They Are:
Smart thermostats are cool gadgets that help control your home’s heating and cooling using Wi-Fi. They’re like super-powered versions of regular thermostats!
How to Use Them:
- Pick Your Thermostat: Choose a smart thermostat like Nest or ecobee. Think about how easy it is to use and if it works with your home’s heating and cooling system.
- Get it Installed: Ask a grown-up to help install the thermostat. It needs to connect to your Wi-Fi and heating/cooling system, so following the instructions is key.
- Connect to Wi-Fi: Make sure your Wi-Fi is strong and connect your thermostat to it. This way, you can control it from your phone or tablet.
- Use the App: There’s usually an app for your smart thermostat. Use it to set schedules for heating and cooling, change temperatures, and see how much energy you’re using.
- Explore Cool Features: Some smart thermostats can learn your habits or use sensors to save energy when you’re not home. It’s like having a brain that knows when to turn things on and off!
Real-Life Examples:
- Saving Money: Smart thermostats can save you money on energy bills by using less power when you’re not home. They’re like energy-saving wizards!
- Automatic Savings: Some thermostats can learn your routine and adjust temperatures for you, saving energy without you doing anything.
- Remote Control: You can change your home’s temperature from anywhere using your phone. So, if you forget to turn off the AC before leaving, no worries—you can do it from wherever you are!
30. Programmable timer for lights
What They Are:
Smart timers for lights are like magical controllers that can turn your lights on and off automatically. They make life easier and help save energy!
How to Use Them:
- Pick Your Timer: There are different types of smart timers, like digital ones or ones you can control with your phone. Choose one that fits your needs and is easy to use.
- Install It: Follow the instructions to install your smart timer. Some might need help from an adult, but others are simple enough for you to set up.
- Connect to Your Lights: Once it’s installed, connect your timer to the lights you want to control. Make sure everything is connected safely.
- Program Your Schedule: Use the timer to set when you want your lights to turn on and off. You can choose specific times, like in the evening or when you’re not home.
- Test It Out: Before you leave or go to bed, check to see if the timer is working correctly. Your lights should turn on and off just like you programmed them.
Real-Life Examples:
- Save Energy: Use the timer to turn off lights automatically when you’re not using them. It’s an easy way to save electricity and help the planet.
- Stay Cozy: Set your lights to turn on before you get home, so it’s warm and welcoming when you arrive.
- Feel Secure: Program the timer to turn lights on and off randomly when you’re away. It makes it seem like someone’s home, which can keep your house safe.
- Outdoor Fun: Use timers for outdoor lights to brighten up your yard, especially when you’re having a party or just enjoying the evening.
31. Motion-activated outdoor lights

What They Are:
Imagine having outdoor lights that turn on when you walk by or when someone approaches your home. That’s exactly what motion-activated outdoor lights do! They light up areas like your driveway or backyard without you having to flip a switch.
How to Use Them:
- Pick the Right Light: Choose a motion-activated light that suits your needs. Think about where you want to install it, how far you want it to detect motion, and how bright you want the light to be.
- Install Your Light: Follow the instructions to install your light in the right spot. It could be on a wall, near your garage, or on a pole. Connect it to a power source and adjust the settings for motion sensitivity and how long the light stays on.
- Give It a Test: Once it’s set up, test your magic light! Walk around the area to make sure it turns on when it should and lights up the way you want it to.
Real-Life Examples:
- Safety First: These lights make it safer to walk around your home at night. They light up dark spots like pathways and driveways, so you can see where you’re going.
- Keep Intruders Away: Motion-activated lights surprise anyone who comes too close to your home, making them think twice about doing anything sneaky.
- No More Fumbling: When you come home late or need to step outside after dark, these lights switch on automatically, so you don’t have to fumble for switches in the dark.
- Save Energy: Since they only turn on when needed, these lights help save electricity. That means they’re good for your wallet and the planet!
32. Security cameras
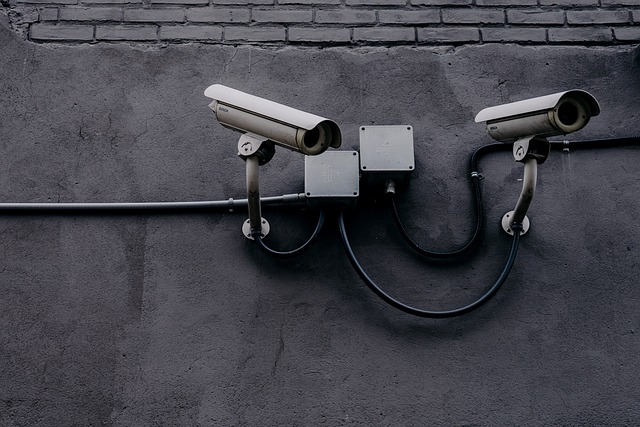
What They Are:
Imagine having eyes that watch over your home 24/7. That’s what security cameras do! They’re like little cameras that record what’s happening around your house. You can use them to keep an eye on everything from your kids and pets to who’s coming and going.
How to Use Them:
- Pick Your Camera: Choose a security camera that fits your needs. Think about where you want to put it, how clear you want the video to be, and if you need it to detect motion.
- Set Up Your Camera: Follow the instructions to install your camera in the right spot. It might go on a wall, by your front door, or even in your backyard. Make sure it’s connected to power and set up the motion detection settings.
- Give It a Test: Once your camera is up, test it out! Walk around the area it’s watching to see if it records when it should and how clear the videos are.
Real-Life Uses:
- Watch Your Kids and Pets: You can use these cameras to see what your little ones and furry friends are up to when you’re not in the room. It’s like having a second set of eyes to keep them safe!
- Keep Unwanted Visitors Away: These cameras can scare off bad guys by catching them on camera. They won’t want to get caught, so they might think twice before trying anything.
- Peace of Mind: When you’re away from home, you can check in on your security camera remotely. It’s like having a virtual visit to make sure everything’s okay.
- Complete Security: You can connect these cameras to other security stuff like smart locks and alarms. That way, you have a full security system keeping your home safe.
Security cameras are like having a secret superhero watching over your home, making sure everything is safe and sound!
33. Smart locks
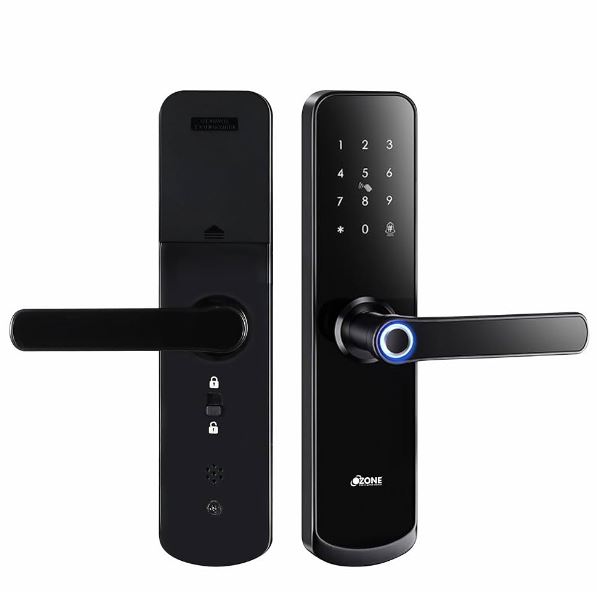
What They Are:
Imagine having a magic key that you can control with your phone. That’s what smart locks do! They’re like super cool locks for your doors that you can open and close using an app on your smartphone or even your voice.
How to Use Them:
- Pick Your Smart Lock: There are different kinds of smart locks, so choose one that fits your door and what you need. Some replace your entire lock, while others work with your existing lock.
- Install Your Smart Lock: Installing a smart lock is like giving your door a high-tech upgrade. It’s usually pretty easy and can be done in about 15 minutes. If your door doesn’t have a deadbolt, you might need a little extra hardware.
- Connect Your Smart Lock: Once your smart lock is installed, connect it to your phone or other smart devices. This lets you control your lock from anywhere, whether you’re at home or out and about.
Real-Life Uses:
- Automatic Locking: With a smart lock, your door can lock itself automatically when you close it. No more worrying if you forgot to lock up!
- Remote Control: You can unlock or lock your door from anywhere using your phone. So, if a friend needs to get in while you’re not home, you can let them in with a tap on your phone.
- Scheduled Access: Want your dog walker to have access only during specific times? Smart locks can do that! You can set schedules for when your door should unlock or lock automatically.
- Guest Access: Hosting a party? Smart locks can generate temporary codes for your guests, so they can get in without you having to give them a physical key.
- Privacy Features: Some smart locks have cool privacy features. For example, you can lock your door with just a tap on your phone if you’re inside and want some alone time.
34. Smart doorbell
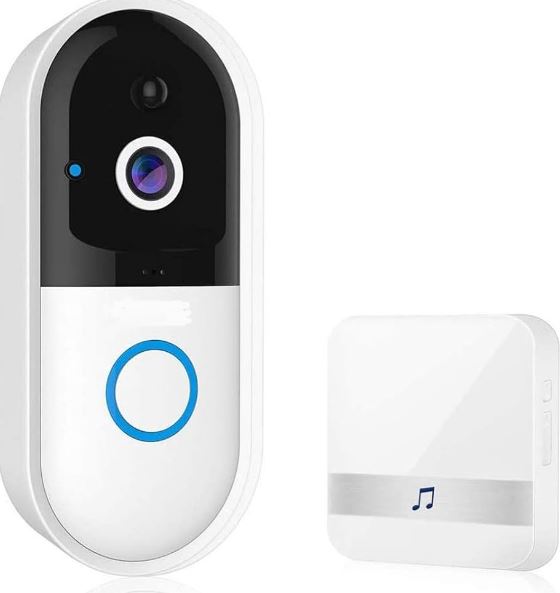
What They Are:
Imagine having eyes and ears at your front door all the time, even when you’re not home. That’s what smart doorbells do! They’re like having a mini security guard right at your doorstep. They come with a camera, a microphone, and a button you can press to talk to whoever’s there.
How to Use Them:
- Get Your Smart Doorbell: There are lots of smart doorbells out there. Choose one that fits your home and your needs. They all work a bit differently, but they all connect to your Wi-Fi so you can use them with your phone.
- Install Your Smart Doorbell: Installing a smart doorbell is like giving your front door superpowers. It usually takes just a few minutes. You’ll need a strong Wi-Fi connection and maybe a drill to mount it.
- Connect Your Smart Doorbell: Once your smart doorbell is installed, connect it to your phone or tablet. This lets you see and talk to whoever’s at your door, whether you’re in the kitchen or out running errands.
Real-Life Uses:
- Keeping Your Home Safe: Smart doorbells help keep your home safe by letting you see and talk to anyone who comes to your door. It’s like having a virtual doorbell camera!
- Making Life Easier: When someone rings your smart doorbell, you get a notification on your phone. You can answer the door without even leaving the couch.
- Working with Other Smart Stuff: Smart doorbells can team up with other smart gadgets, like smart locks. You can unlock your door for a friend right from your phone.
- Checking Out Visitors: If you’re not sure who’s at your door, just check the camera on your smart doorbell. You can see if it’s a delivery person, a neighbor, or just a friendly visitor.
- Playing Well with Others: Smart doorbells can also talk to other smart devices. For example, they can turn on your smart lights when someone rings the doorbell at night.
Home Maintenance and Repair:
35. Caulking gun

What They Do:
Ever notice little gaps or cracks around your windows, doors, or even in the bathroom? Caulking guns are those that help seal up those gaps and keep your home cozy and dry. They hold a special gooey material called caulk that fills in those spaces and stops air and water from sneaking in.
How to Use Them:
- Load Up the Gun: Press the release button at the back of the gun and pull the plunger all the way back.
- Insert the Caulk Tube: Stick the caulk tube into the gun, nozzle-first.
- Push the Plunger: Push the plunger snugly into the back of the tube and let go of the release button.
- Get the Caulk Ready: Cut the tip of the caulk tube to match the size of the gap you want to fill. Then, poke a hole in the tube’s inner seal with a nail or pin.
- Time to Caulk: Hold the gun at a 45-degree angle along the gap you’re sealing.
- Squeeze and Glide: Slowly squeeze the gun’s handle or trigger while moving it along the gap. When you can’t squeeze anymore, let go. The gun will bounce back automatically.
- Smooth Things Out: After you’ve caulked the gap, smooth the caulk with your finger or a caulk finishing tool for a neat finish.
Real-Life Uses:
- Sealing Windows and Doors: Caulk around windows and doors to keep out drafts and water.
- Bathroom TLC: Seal gaps around bathtubs and showers to prevent leaks and mold.
- Kitchen Fixes: Use it around sinks and countertops to stop water from seeping in.
- Home Exterior Care: Seal gaps in your roof or walls to keep your home snug and dry.
36. Silicone caulk
What It Does:
Imagine tiny gaps or cracks in your home – they let in drafts and water, right? That’s where silicone caulk swoops in like a hero! It’s a special gooey stuff that seals up those gaps and keeps your home cozy and dry. It’s super strong, lasts a long time, and doesn’t mind getting wet!
Types of Silicone Caulk:
- Silicone Polymer Caulk: This type is great for sealing gaps around sinks, tubs, and windows. It’s like a tough shield against water and mold.
- Silicone Rubber Caulk: Use this one for outdoor jobs. It’s extra durable and can handle sun, rain, and wind without breaking a sweat.
Real-Life Uses:
- Bathroom Bliss: Seal gaps around your bathtub or sink to keep water from sneaking into walls.
- Window Warrior: Use it around windows to stop drafts and leaks on rainy days.
- Door Defender: Seal gaps around doors to keep out chilly drafts and pesky bugs.
- Outdoor Oasis: Use silicone rubber caulk outside to seal gaps in your siding or around outdoor fixtures.
37. Wood glue
What It Does:
Picture a magical sticky potion, but just for wood! That’s wood glue. It’s a adhesive made just for wooden stuff. Whether you’re fixing a wobbly chair, building a bookshelf, or crafting something cool, wood glue is your go-to buddy.
How to Use It:
- Prep the Wood: Before gluing, make sure the wood is clean and smooth. Sand away any rough bits so the glue sticks perfectly.
- Apply the Glue: Spread a thin, even layer of wood glue on one of the surfaces you’re sticking together. You don’t need a ton – just enough to coat it nicely.
- Stick ‘Em Together: Line up the pieces and press them firmly. If it’s a big job, use clamps or heavy books to hold everything snug while the glue works its magic.
- Let It Cure: Give the glue some time to set and do its thing. Depending on the type of wood glue, this might take a few hours.
- Sand and Finish: Once the glue is dry, sand down any rough spots. Then, if you like, paint, stain, or varnish your project to make it look extra fancy.
Real-Life Jobs:
- Furniture Fixes: Fix wobbly chairs, loose table legs, or cracked cabinets with wood glue.
- Building Brilliance: Build bookshelves, outdoor furniture, or cool crafts using wood glue to hold everything together.
- Floor Fun: Repair creaky floors or reattach loose boards with a bit of wood glue.
- Door Delight: Fix squeaky hinges, loose handles, or damaged door panels using wood glue.
- Crafty Creations: Get creative with picture frames, wall art, or decorative boxes – all held together with wood glue.
38. Sandpaper assortment
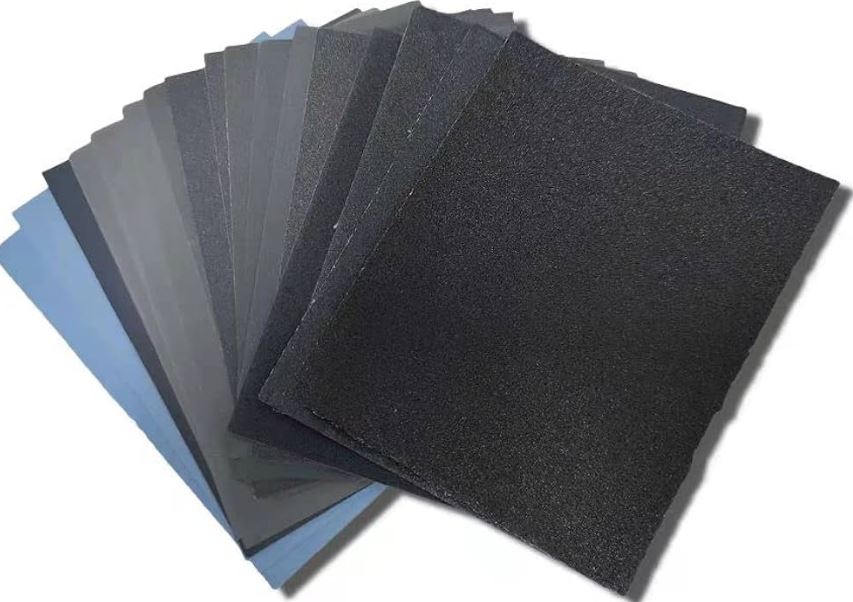
What They Are:
Sandpaper assortments are like having a magic kit with different superpowers for your home projects! They come with sandpaper sheets that have different roughness levels, which we call “grit sizes.” These help you do all sorts of things like making surfaces super smooth, roughening them up for a cool effect, or cleaning them up like a pro.
How to Use Them:
- Pick Your Power: Think of grit sizes like the strength of your superhero. Smaller numbers mean they’re rough and tough, great for heavy-duty jobs. Larger numbers are like the smooth talkers, perfect for giving that final touch.
- Let’s Get Sanding: Press the sandpaper onto the surface and start rubbing gently. You can go in circles or back and forth – whatever feels right. Just remember not to go too hard; we want superhero strength, not Hulk smash!
- Cleanup Time: Once you’ve worked your magic, grab a damp cloth or a vacuum with a soft brush to sweep away any dust or debris. Your surface should look spick and span!
- Fine-Tuning: If things aren’t exactly how you want them, don’t worry! Switch to a finer grit sandpaper and repeat the process until you’re happy with the results. It’s like getting that superhero costume just right for the big showdown.
Real-Life Heroics:
- Paint Perfect: Smooth out walls or furniture before painting for that flawless finish.
- Furniture Makeover: Strip away old paint or varnish from wooden furniture to give it a whole new life.
- Edge Charm: Make rough edges on wooden surfaces, like door frames or window sills, disappear like magic.
- Bonding Powers: Prep surfaces for gluing, whether you’re fixing a wobbly table or building something from scratch.
- Shine Bright: Buff out scratches on metal or plastic stuff, from your favorite jewelry to kitchen gadgets or even your trusty car parts.
39. Electrical tape

What It Is:
It’s like a special adhesive tape made to protect and insulate electrical stuff. Whether it’s wires, connections, or gadgets, electrical tape is there to keep things safe and sound.
How to Use It:
- Safety First: Before you do anything, make sure the power is OFF. No accidental superhero sparks here!
- Tape Time: Choose the right tape for the job. Think of it like picking the right tool from your superhero utility belt.
- Wrap It Up: Wrap the tape around wires or connections, making sure to cover everything up nicely. Use the half-lap method – that means each turn overlaps the previous one halfway. It’s like giving your wires a cozy blanket!
- Press and Seal: Press the tape down firmly to make sure it sticks like glue. We want that bond to be super strong!
Real-Life Heroics:
- Wire Protection: Keep those wires safe and snug by using electrical tape to cover them up in outlets, switches, or appliances.
- Fix It Up: Got some damaged wires? No problem! Wrap them in electrical tape to stop any more trouble.
- Box Security: Use electrical tape to seal up boxes, just like sealing secret superhero gear. No peeking allowed!
- Sports Buddy: Wrap your sports gear handles with electrical tape for a better grip. It’s like giving your equipment a power-up!
- Color Code Fun: Use different colored tapes to mark different wires or circuits. It’s like giving each wire its own superhero costume!
40. Power strip/surge protector
What They Are:
Power strips and surge protectors keep your gadgets safe from sudden power problems and let you plug in lots of devices at once.
Power Strip Magic:
- Plug Power: Imagine a power strip as a super long extension cord with lots of outlets. You can plug in your phone, tablet, lamp, and more all at once!
- Energy Saver: Some power strips are smart – they can turn off power to gadgets when they’re not being used. It’s like a superhero putting things on standby mode to save energy.
Surge Protector Shield:
- Lightning Defense: Surge protectors are like shields against sudden power spikes, especially from lightning or electrical glitches. They send extra voltage safely to the ground, keeping your gadgets safe.
- Gadget Guardian: When there’s a power surge, surge protectors jump into action, protecting your electronics from getting fried. It’s like having a guardian angel for your gadgets!
Using Them Together:
- Pick Your Sidekicks: Choose the right power strip and surge protector based on how many gadgets you have and how much protection they need.
- Get Ready: Follow the instructions to set up your surge protector – plug it in and make sure it’s ready for action.
- Power Up: Plug your gadgets into the power strip, and then plug the power strip into the surge protector. Think of it like your gadgets lining up for superhero training!
- Activate the Shield: Turn on the surge protector, and your gadgets are now safe from power surges and ready to go!
Real-Life Heroics:
- Office Defender: Keep your computer, printer, and office gear safe with a surge-protected power strip.
- Entertainment Guard: Shield your TV, gaming console, and sound system from power problems with a surge protector.
- Bedroom Protector: Keep your alarm clock, lamp, and gadgets safe in your bedroom with a surge protector.
- Outdoor Heroics: Power up outdoor lights, fans, and chargers with surge protection, ready for any weather surprises.
- Appliance Avenger: Safeguard big appliances like your HVAC system, stove, and washer with a surge protector. They’re the heart of your home!
Organization and Storage:
41. Nesting storage containers

What They Are:
Nesting storage containers are like boxes that stack neatly inside each other when not in use, saving tons of space. They’re like puzzle pieces that fit perfectly together!
Super Storage Steps:
- Find Your Match: Pick the nesting containers that fit your stuff best. Think about what you want to store and how much space you have.
- Sort and Simplify: Organize your things into categories, like clothes, toys, or snacks. This way, you know where everything goes and can find it easily later.
- Stack Like a Pro: Arrange your nesting containers in a tidy stack in a handy spot, like a closet or under your bed. It’s like creating your own storage tower!
- Tag Your Trophies: Label each container with what’s inside. This makes finding stuff a breeze – no more digging through mystery boxes!
Real-Life Superhero Moves:
- Kitchen Capers: Keep your pantry neat by using nesting containers for pasta, snacks, and baking supplies. No more food avalanche!
- Closet Quest: Store your seasonal clothes in nesting containers. Sweaters in winter, swimsuits in summer – everything has its place without taking up too much space.
- Garage Galore: Tame the chaos in your garage with nesting containers for tools, sports gear, and gardening supplies. It’s like a superhero hideout for your stuff!
- Toy Time: Keep your play area tidy by storing toys in nesting containers. Kids can easily find what they want and clean up afterward – a win-win!
- Office Oasis: Organize your home office with nesting containers for papers, pens, and gadgets. Everything stays in its place, so you can focus on being super productive.
42. Furniture sliders
What They Are:
Furniture sliders are like pads that go under your furniture legs. They’re super lightweight and help you move heavy stuff around without scratching your floors.
Easy Moving Steps:
- Pick Your Sliders: Choose sliders that match your furniture legs and floor type. Felt sliders are great for hardwood, while plastic ones work well on carpet.
- Read the Manual: Open the package and check out the instructions. Each slider type might have its own tricks for best results.
- Buddy Up: Grab a friend to help with the heavy lifting. It’s safer and more fun together!
- Clear the Way: Take stuff off your furniture before moving it. Clearing the path makes moving smoother.
- Slide and Center: Lift or tilt your furniture slightly and slip a slider under each leg. Make sure each leg is centered on the slider for a stable ride.
- Push, Don’t Pull: Push your furniture gently instead of pulling. Pushing is easier on your back and keeps everything steady.
- Say Goodbye to Sliders: When you reach your destination, lift or tilt the furniture to remove each slider. It’s like saying goodbye to your moving helpers!
- On to the Dolly: If you’re using a dolly, slide its metal edge under your furniture. Tilt the piece back onto the dolly gently. Remove the sliders and secure your item on the dolly.
Real-Life Moving Moments:
- Appliance Adventures: Move heavy appliances like fridges or washing machines without leaving scratch marks or dents on your floors.
- Furniture Feats: Transport big furniture pieces like bookcases or dressers to a new spot without breaking a sweat.
- Room Revamp: Rearrange your room by shuffling furniture around for a fresh look and feel.
- Tech Transfer: Shift hefty gadgets like printers or computers to a new workspace without straining your muscles.
- Storage Shuffle: Reorganize storage areas like garages or closets by moving heavy items around effortlessly.
43. Tool storage box or cabinet
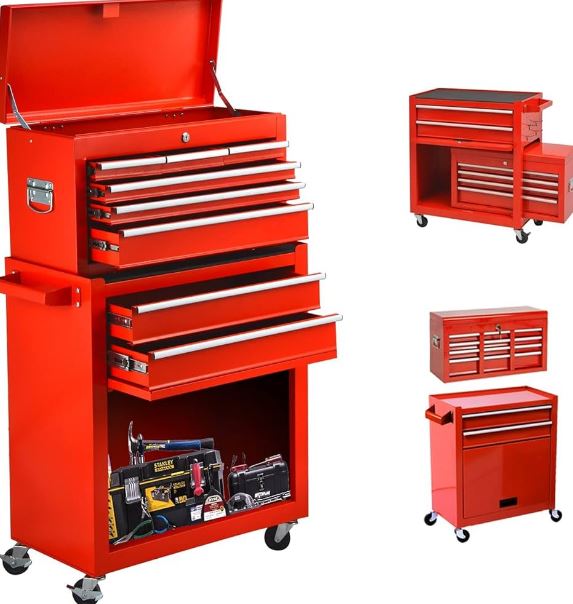
What They Are:
Tool storage boxes and cabinets are like secret hideouts for your tools. They come in different sizes and materials, from sturdy plastic to tough metal, and they keep your tools organized and ready for action!
Where They Shine:
- Home Workshops: Keep your tools in check in your own little workshop. No more digging through piles of stuff to find what you need!
- Garage Goodness: Make your garage a tool haven. Find everything from wrenches to power tools in a snap.
- Home Makeovers: Tackle DIY projects like a champ. Keep your tools tidy and accessible during painting, plumbing, or fixing up your space.
- Outdoor Adventures: Conquer outdoor tasks with ease. From gardening to home repairs, have the right tool right at hand.
Real-Life Tool Tales:
- Handy Hand Tools: Keep screwdrivers, wrenches, and pliers in a trusty metal toolbox. No more rummaging around for the right tool!
- Powerful Power Tools: Store drills, saws, and sanders in a big plastic toolbox. Ready to tackle any project that comes your way!
- Painting Paradise: Organize brushes, rollers, and paint cans in a wooden tool cabinet. Say goodbye to messy paint corners!
- Garden Galore: Keep trowels, pruning shears, and rakes in a plastic toolbox with handy dividers. Gardening just got easier!
- Electrical Efficiency: Store wire strippers, crimpers, and multimeters in a stackable plastic toolbox with drawers. Fixing electronics? No problem!
44. Shelving units
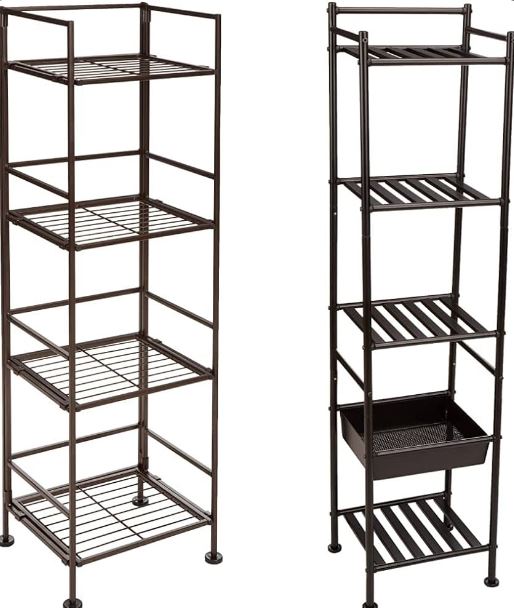
What They Are:
Shelving units are like towers that hold all your stuff in place. They can be made of wood, metal, or wire, and they help you keep everything neat and tidy.
Where They Work Best:
- Garage Goals: Store your tools, sports gear, and DIY supplies in a garage shelving unit. No more searching for that missing screwdriver!
- Office Oasis: Keep your books, files, and cool stationery in order with a shelving unit in your home office. Work smarter, not harder!
- Pantry Power: Store your snacks, spices, and cooking essentials in a kitchen pantry shelving unit. Cook up a storm without the clutter!
- Bedroom Bliss: Keep your clothes, shoes, and favorite things organized in a bedroom shelving unit. A tidy room means a peaceful mind!
- Living Room Loveliness: Display your books, photos, and décor in a living room shelving unit. Show off your style without the mess!
Real-Life Shelving Adventures:
- Garage Gadget Galore: Keep wrenches, hammers, and nails in check with a sturdy garage shelving unit.
- Office Organization Magic: Store textbooks, notebooks, and pens in a cool home office shelving unit. Homework just got easier!
- Pantry Paradise: Keep cereal boxes, spice jars, and snacks in order with a kitchen pantry shelving unit. Cooking dinner? No sweat!
- Bedroom Bonanza: Store clothes, shoes, and toys in a bedroom shelving unit. Sleep soundly in a clutter-free space!
- Living Room Luxury: Display books, photo frames, and souvenirs in a living room shelving unit. Movie nights just got cozier!
Cleaning and Maintenance:
45. Drain snake or auger
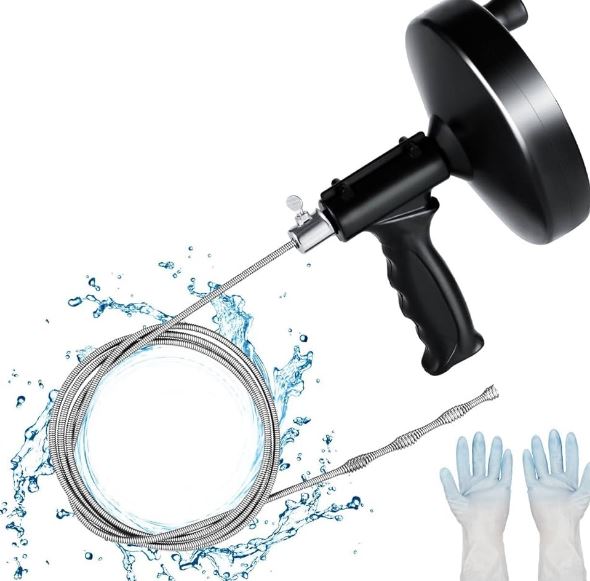
What It Is:
A drain snake or auger is like a superhero tool for fixing clogged sinks, tubs, and toilets. It’s basically a long, twisty cable that can wiggle its way through pipes to break up stubborn clogs.
How to Use It:
- Pick Your Snake: Choose the right type of drain snake for the job. A handheld one is good for small clogs, but for tough jobs, go for a motorized one with a long cable.
- Get in There: Stick the auger head into the drain or pipe opening. It’s like sending your snake into battle!
- Start Snaking: Push the coiled wire firmly into the pipe to get it going. You’re on a mission to bust that clog!
- Crank and Feed: While holding the wire steady, crank the handle to feed more cable into the pipe. Apply some muscle to break through the blockage.
- Extend and Repeat: Pull back a bit, lock, and crank again. Keep doing this until you’ve fed all the cable into the pipe.
- Reel It In: Now gently pull the snake out while cranking. It’s like fishing for clogs!
- Clean Up: Remove any gunk that comes up with the cable. That corkscrew end is a clog-busting champ!
- Keep Going if Needed: If the clog isn’t gone, repeat the snaking process until victory is yours!
Real-Life Drain Adventures:
- Sink Savior: Use a drain snake to rescue your sink from hair, soap, or food clogs.
- Toilet Trouble Shooter: Bust toilet clogs with a closet auger without harming your porcelain throne.
- Tub Triumph: Banish hair and soap clogs from your bathtub drain with a trusty drain snake.
- Shower Showdown: Beat shower drain clogs caused by hair and soap scum with your handy drain snake.
46. Plunger
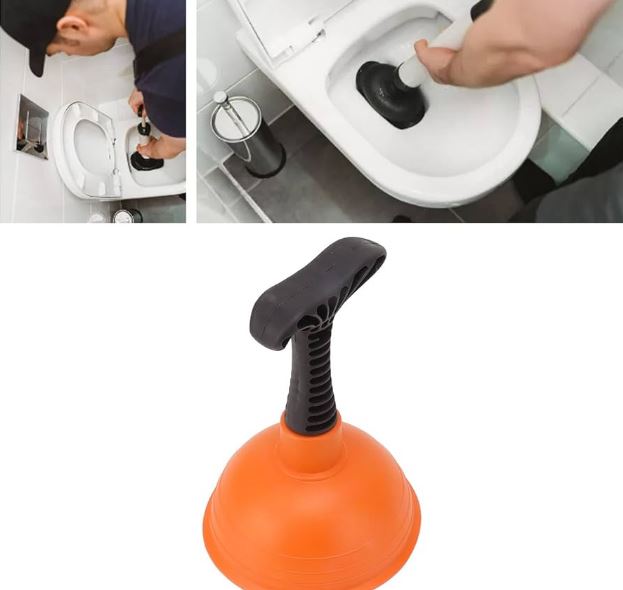
What They Are:
A plunger is used for unclogging drains and pipes. It’s got a rubbery suction cup attached to a handle, and it’s ready to save your day when sinks, tubs, or toilets get clogged.
How to Use Them:
- Pick Your Plunger: Choose the right plunger for the job. The classic cup plungers work wonders for sinks and drains, while the flange plungers are the best sidekicks for tackling toilet clogs.
- Get It Wet: Give your plunger’s rubber cup a quick dip in water. It helps create a stronger seal.
- Position It Right: Place the plunger over the drain or toilet opening. Make sure the rubber cup covers the whole thing like a superhero cape.
- Push and Seal: Push down firmly to create a tight seal. Your plunger is gearing up for battle!
- Plunge Away: Start plunging up and down like a pro. Each plunge creates suction, fighting off the clog with every move.
- Keep Going: Plunge several times until you feel the clog giving way. It’s a battle of wills, and you’re winning!
- Try Alternatives if Needed: For tough clogs, you can try a chemical drain cleaner for sinks or a plumber’s snake for the really stubborn blockages.
Real-Life Drain Adventures:
- Sink Savior: Use a cup plunger to rescue your sink from hairballs, soap gunk, or food bits.
- Toilet Trouble: Tackle toilet clogs fearlessly with a flange plunger, saving the day without harming your porcelain throne.
- Tub Triumph: Defeat bathtub clogs caused by hair and soap scum with your trusty plunger.
- Shower Showdown: Banish shower drain clogs with plunging power, keeping your showers flowing smoothly.
47. Wet/dry vacuum
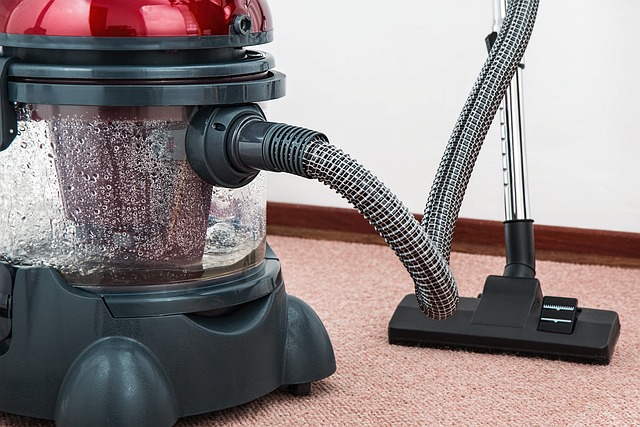
What They Are:
Wet/dry vacuums can handle everything from dry messes like dust and dirt to wet spills like juice or even water in the basement.
How to Use Them:
- Pick Your Hero: Choose the right wet/dry vacuum for your needs. Look at how much it can hold, how powerful it is, and what attachments it comes with.
- Power Up: Plug in your vacuum and flip that switch to turn it on. Your cleaning adventure is about to begin!
- Choose Your Weapon: Select the attachment that suits your cleaning mission. Want to clean tight spots? Use the crevice tool. Floors need some love? Grab the brush attachment.
- Get Cleaning: Turn on your vacuum and start tackling those messes. It’s time to show dust, dirt, and spills who’s boss!
Real-Life Cleanup Adventures:
- Spill Saver: Use your wet/dry vacuum to rescue floors from spills like water, juice, or even oil.
- Floor Fighter: Battle dust, dirt, and debris on carpets and floors with the powerful suction of your vacuum.
- Upholstery Upgrade: Use the brush attachment to clean sofas and chairs, saying goodbye to pet hair, dust, and dirt.
- Garage Guru: Conquer debris and spills in the garage or workshop, making it sparkle again.
- Car Companion: Give your car’s interior a makeover by using the wet/dry vacuum to suck up dirt, dust, and crumbs.
48. Air purifier

What They Are:
Air purifiers are like that zap away dust, allergens, and funky odors from your indoor air. They make your home a fresher, healthier place to breathe. Investing in a high-quality air purifier can further improve indoor air quality, removing even the tiniest particles and keeping your living space clean and comfortable.
How to Use Them:
- Spot the Trouble: Figure out which room needs air improvement. Is it your bedroom, living room, kitchen, or maybe your cozy home office? Every space deserves clean air!
- Choose Your Defender: Pick the right air purifier for the job. Make sure it’s sized right for your room and tackles the specific air issues you face, like allergies or pesky odors.
- Find Its Spot: Place your air purifier where it can work its magic best. Near a window for fresh air intake, in the middle of the room for even circulation, or against a wall for discreet operation.
- Power It Up: Follow the instructions to set up your air purifier. Plug it in, choose the right filter, and adjust the fan speed to your liking.
- Keep It Running: Let your air purifier do its thing round the clock for top-notch air quality. Remember to change the filters as recommended for peak performance.
Real-Life Air Adventures:
- Bedroom Bliss: Banish dust mites, pet dander, and pesky odors from your bedroom with an air purifier for sweet dreams and fresh mornings.
- Living Room Freshness: Kick out smoke, cooking smells, and pet odors from your living room, making it a cozy haven for family time.
- Kitchen Clean Air: Combat cooking odors, greasy smells, and airborne kitchen gunk for a fresh and inviting cooking space.
- Office Oasis: Create a clean-air sanctuary in your home office, free from allergens and stuffy odors, so you can focus and work comfortably.
- Post-Renovation Relief: After a renovation or moving into a new place, let your air purifier clear out dust, chemicals, and pollutants, so you breathe easily.
As we wrap up our exploration of various home improvement products, I’d love to hear from you! Have you come across any other useful products that have made a significant difference in your home improvement projects?
Share your insights and recommendations in the comments below.
Your experiences and tips could inspire others and help them discover new ways to enhance their living spaces. Let’s continue learning and growing together as we strive to make our homes more comfortable, functional, and beautiful!