Your computer doesn’t have to be ancient to slow down. A brand-new machine—whether it’s running the latest Windows 11 or featuring the fastest SSD available—can lose its responsiveness within months if left unattended. The frustrating part? This slowdown is almost never about your hardware failing. It’s about accumulated clutter, background processes, and poor configuration decisions.
The reality is simple: modern PCs ship in a compromised state. Manufacturers pre-load bloatware, Windows enables aggressive background services by default, and every application you install competes silently for your system’s resources. Unlike older computers that truly aged due to mechanical wear, today’s slowdowns are preventable—and often reversible with methodical optimization.
What makes 2025 different? The focus has shifted. You’ll no longer find merit in registry cleaning, task killers, or aggressive system tweaks that dominated PC optimization advice ten years ago. Instead, successful optimization in 2025 centers on intelligent configuration, mindful software choices, and understanding how modern Windows actually manages your hardware. The good news: the strategies that work are straightforward, risk-free, and deliver measurable results.
This guide covers what genuinely improves performance, separates myth from reality, and explains the “why” behind each recommendation so you can optimize with confidence rather than superstition.
Start With a Performance Reality Check
Understand Where Your PC Is Actually Struggling
Before attempting any optimization, identify your specific bottleneck. Every slow computer has a root cause, but it’s rarely obvious. A system that takes 45 seconds to boot might struggle with startup programs, not a failing SSD. An application that freezes might be fighting for RAM while your processor sits idle. A browser that crawls might be throttled by a weak Wi-Fi connection, not your hardware.
Three distinct performance problems require different solutions:
Boot Slowness happens when starting your computer takes longer than 60 seconds. This almost always points to excessive startup programs, not hardware failure. Your operating system loads from storage only once during boot; after that, it’s about competing background processes.
Application Lag occurs when individual programs—your browser, photo editor, spreadsheet—feel sluggish to respond. This typically signals either insufficient RAM (if many applications run simultaneously), storage speed issues (if the program must access large files), or GPU limitations (for graphics-heavy software). Identifying which application specifically lags matters, because a slow browser suggests different problems than a slow video editor.
Multitasking Stutters manifest when your PC feels responsive for a few seconds, then becomes unresponsive for brief moments while you work. This pattern usually indicates RAM pressure: Windows is using your storage drive as virtual memory, which is 100 to 1,000 times slower than actual RAM. Your operating system pauses frequently to shuffle data between physical memory and disk storage.
Understanding your specific problem prevents wasting time on irrelevant optimizations.
Essential Tools to Check PC Health
Task Manager (Built-in, Risk-Free)
Open Task Manager by pressing Ctrl+Shift+Esc. The Processes tab shows every running application with real-time CPU, memory, and disk usage. The Performance tab displays graphical trends over time, helping you spot patterns. The Startup tab reveals programs launching automatically—and critically, marks them as “Low,” “Medium,” or “High” impact on boot time.
Most Windows users overlook the Startup tab’s impact ratings. A program marked “High impact” might add 10-30 seconds to your boot time alone. This single tab often contains the explanation for slow boot performance.
Performance Monitor (Advanced, Built-in)
More detailed than Task Manager, Performance Monitor (search “perfmon” in Windows) tracks system metrics over extended periods. It’s overkill for casual users but invaluable if you suspect intermittent slowdowns. You can create custom charts monitoring CPU, memory, disk, and network performance over hours or days.
Free Third-Party Tools (Reputable Only)
Avoid the crowded space of “PC optimization” software. Most are borderline scams promising speed improvements that don’t materialize. If you need third-party tools:
-
HWiNFO: Displays real-time hardware temperatures and clock speeds
-
CrystalDiskInfo: Monitors SSD and HDD health status
-
Process Explorer (from Microsoft Sysinternals): More detailed process monitoring than Task Manager
Skip anything claiming to “boost performance” or “clean your registry.” These are marketing fantasies, not optimization tools.
The Biggest Software Fixes (High Impact, Zero Cost)
Clean Up Startup Programs
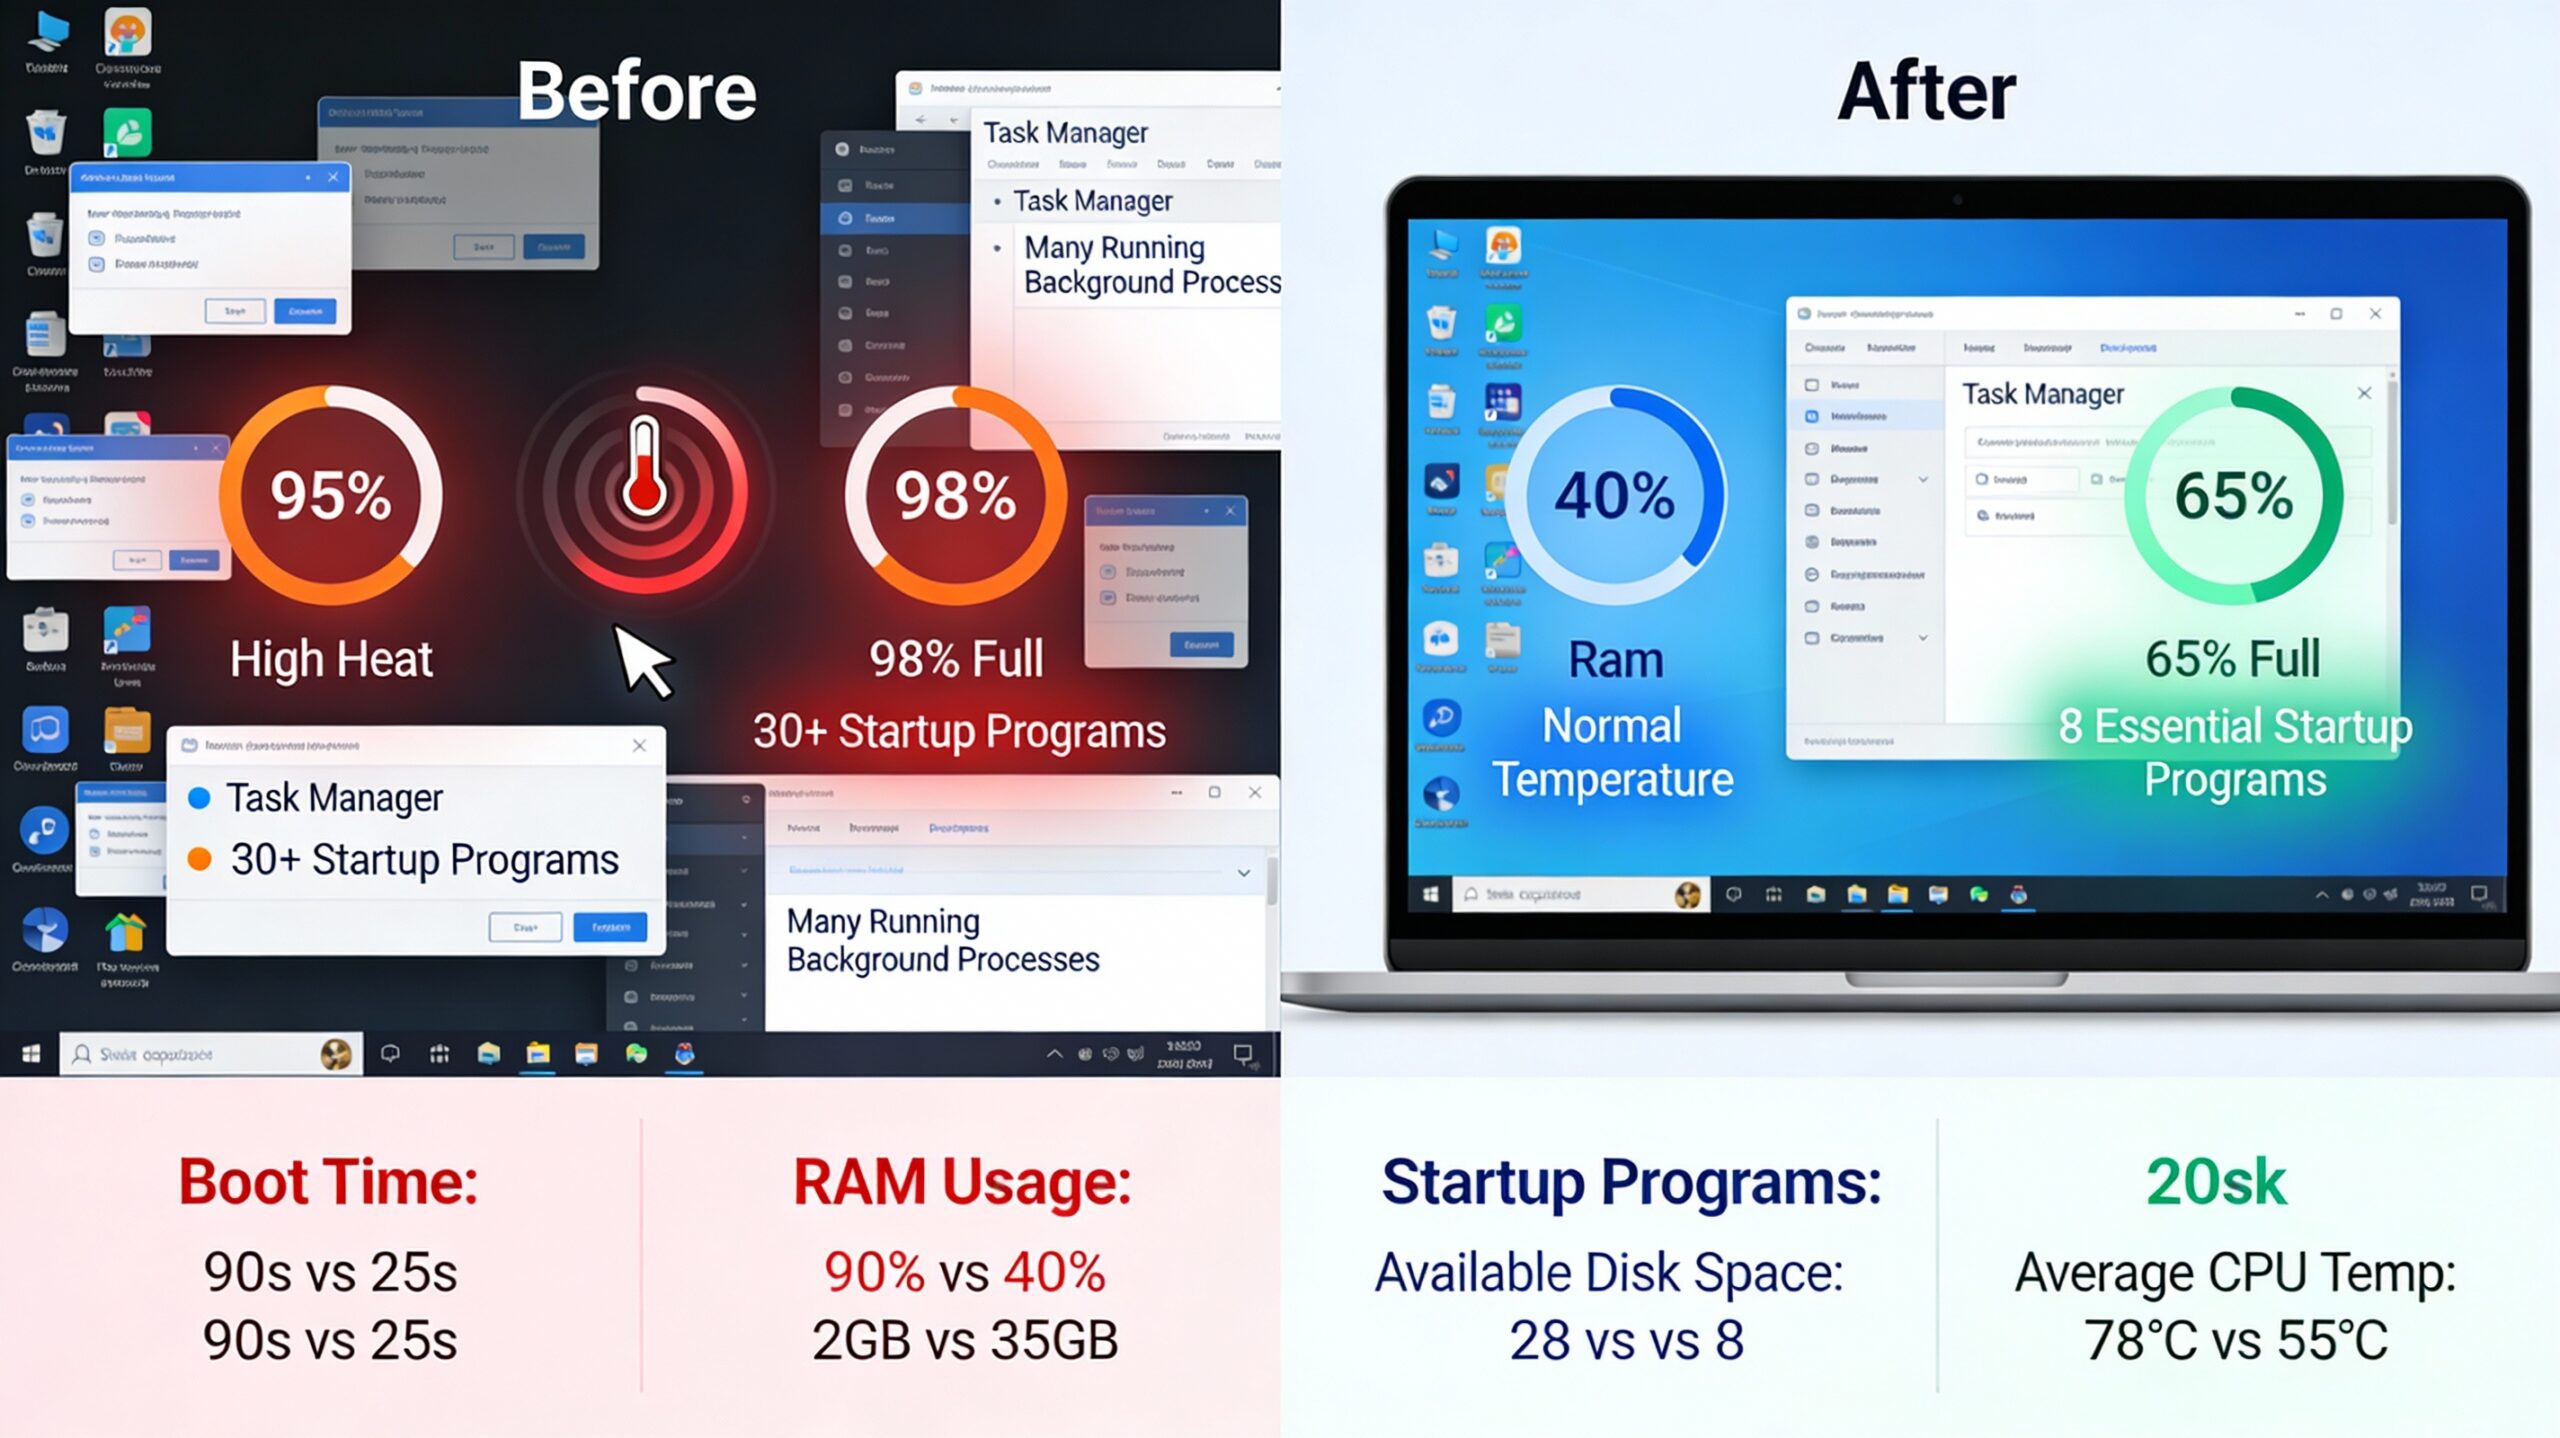
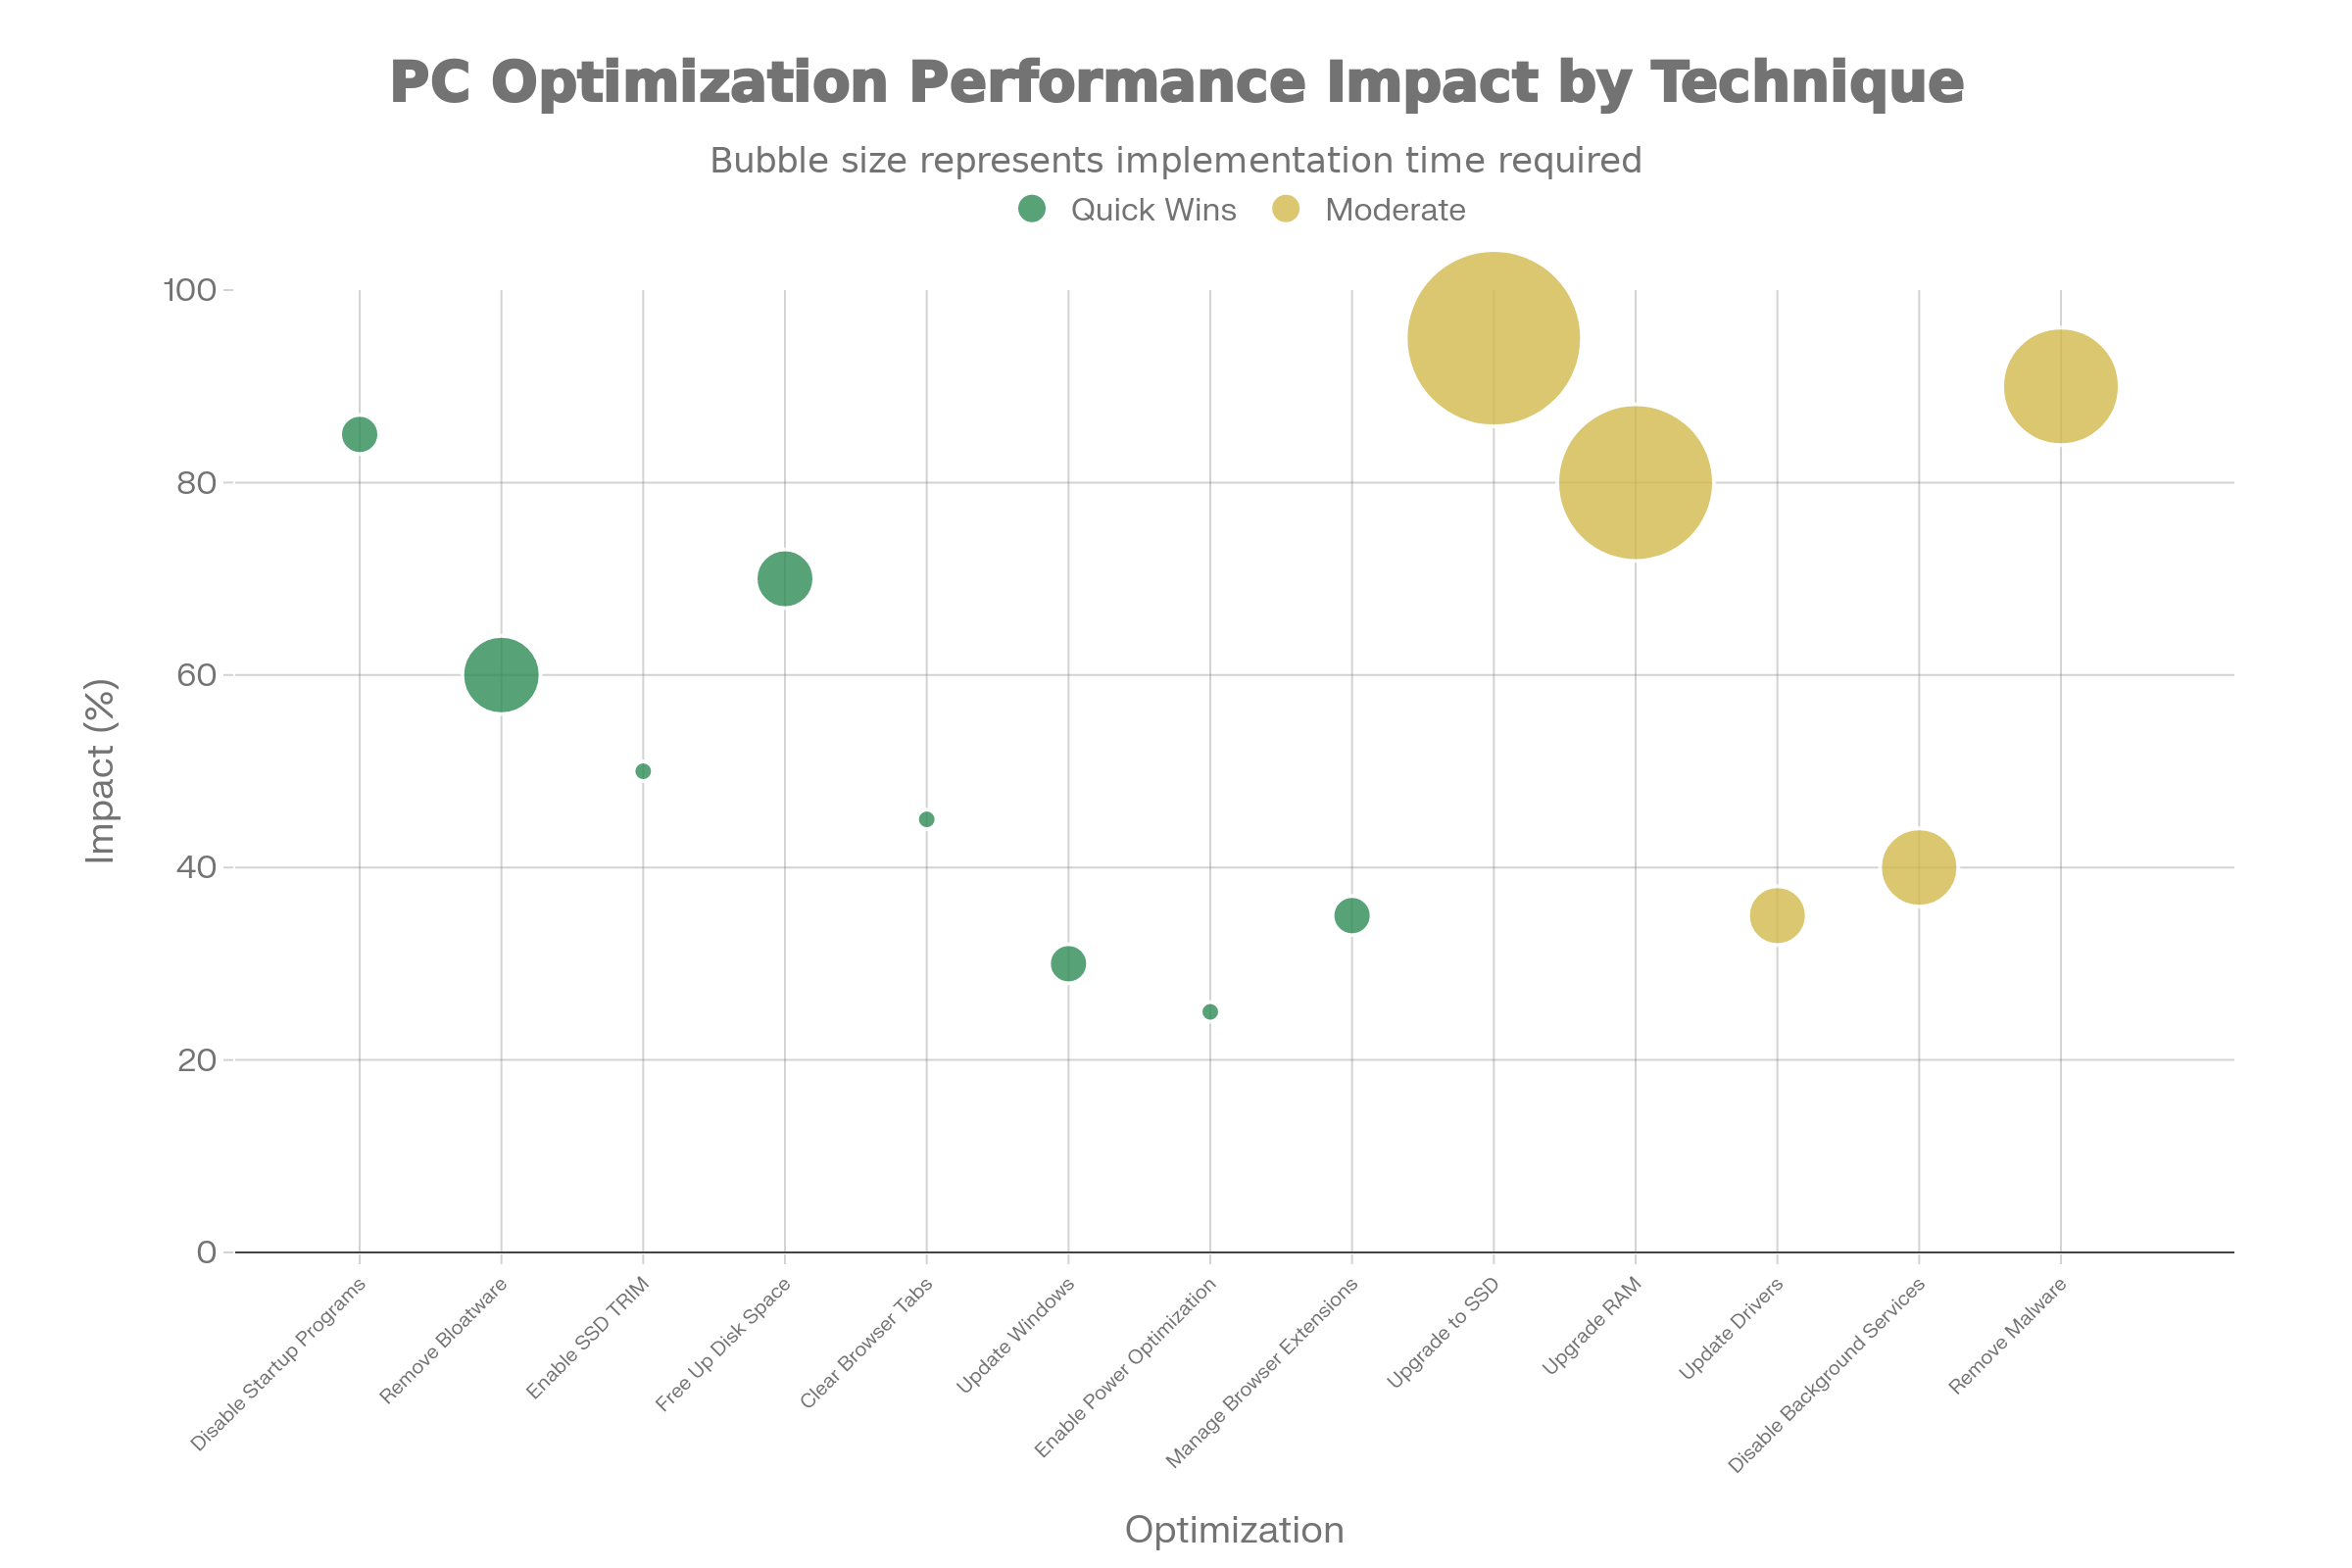
Over 60% of reported PC performance issues relate to excessive startup processes. When you power on your computer, anything in the startup list launches automatically and consumes RAM, CPU, and disk I/O immediately. If you have 15 startup applications, your PC is doing 15 applications’ worth of work before you even open a browser or document.
The impact is dramatic: systems with aggressive startup programs often take 60-90 seconds to boot, while the same hardware with optimized startup launches in 20-30 seconds.
What Actually Happens During Startup
Your SSD reads the Windows operating system files (unavoidable). Then, before you can use your computer, dozens of background services and user-installed programs launch. Each competes for disk I/O bandwidth. Imagine 10 people trying to grab items from the same shelf simultaneously—everything takes longer.
How to Safely Disable Startup Programs
Open Task Manager (Ctrl+Shift+Esc), then click the Startup tab. Windows displays every program set to launch automatically, including the “Startup impact” column. Focus on programs marked “High”—these are your priority.
Right-click any program and select Disable. It won’t uninstall the program; it simply prevents automatic launching. You can still open it manually when needed.
Safe Candidates for Disabling
-
Messaging apps (Skype, Discord, Telegram): Open them manually when needed
-
Creative tools (Adobe, Affinity): These launch background services consuming 200+ MB of RAM
-
Cloud sync services (OneDrive, Dropbox): Resume automatic syncing after boot completes
-
GPU control software (NVIDIA GeForce Experience, AMD Radeon Settings): Not needed until gaming
-
Game launchers (Steam, Epic Games): Absolutely disable these
-
Update services (Adobe, Java, Chrome): These run in the background anyway
What NOT to Disable
Never disable Microsoft Defender Antivirus Service—your system depends on real-time protection. Similarly, avoid disabling Windows Update services, chipset drivers, or audio services. If you’re uncertain about a process, search for it in Task Manager: right-click the process and select “Search online.” Microsoft’s official documentation clarifies whether it’s essential.
Expected Results
Disabling 5-10 unnecessary startup programs typically reduces boot time by 20-50%. Users report boot times falling from 90+ seconds to 30-45 seconds. This single action provides the highest performance-per-effort ratio of any optimization.
Remove Hidden Bloatware & Junk Software
Manufacturers pre-install software on new PCs: trial antivirus, cloud services, brand applications, and trial subscriptions. Windows 11 itself arrives with numerous Microsoft apps many users never touch. This bloatware consumes disk space, RAM, and CPU cycles even when minimized.
Distinguishing Bloatware from Essential Software
Ask yourself: Did I install this, or did it arrive with my PC? Do I use it at least monthly? Could I accomplish the same task with built-in Windows features?
Microsoft Edge, Paint, and Notepad are built-in—keep them. Microsoft Store, Weather app, and News app are bloatware for most users. Trial versions of antivirus, productivity suites, and brand-specific applications are almost always bloatware.
Safe Uninstallation Method
Go to Settings > Apps > Installed Apps. Scroll through the list—manufacturers’ applications are obvious (Dell, HP, Lenovo branding). Microsoft’s built-in apps (Calculator, Snipping Tool, Settings) are genuine. Click on each bloatware item and select Uninstall.
Most uninstall cleanly. Some occasionally require restart, which is fine. Microsoft apps can be reinstalled anytime from the Microsoft Store if you change your mind.
Preventing Reinstallation
Windows and manufacturers sometimes reinstall removed bloatware after major updates. To prevent this:
-
Go to Settings > System > Notifications & actions
-
Turn off “Get tips, tricks, and suggestions as you use Windows”
-
Go to Settings > Apps > General
-
Turn off “Get suggestions for third-party apps”
These settings prevent Microsoft from suggesting and auto-installing additional bloatware.
Optimize Background Processes
Disabling startup programs is step one. But Windows and installed applications spawn background processes throughout your session. Cloud sync services continuously monitor files. Update checkers periodically connect to the internet. Indexing services scan your storage. Each consumes CPU and RAM resources—usually not noticeably, but collectively they add up.
Identify What’s Actually Running
Open Task Manager and click the Processes tab. Sort by Memory (click the column header). Look for programs consuming 100+ MB while you’re not actively using them. Sort by CPU to find processes consistently consuming processor resources.
Common resource-hungry background processes include:
-
Search Index (Windows Search): Continuously scans files for instant search results. Useful for some users; unnecessary for others
-
Cloud Sync (OneDrive, Dropbox, Google Drive): Syncs files in the background, causing occasional disk activity
-
Delivery Optimization: Shares Windows updates with other computers to reduce Microsoft’s bandwidth costs
-
Graphics Drivers: Sometimes run background services
-
Windows Update: Periodically checks for updates and downloads them
-
Antivirus: Maintains real-time protection (necessary; don’t disable)
When to Disable Background Services
Windows Search: If you rarely use the search feature, disable it. Go to Services (search “services.msc”), find Windows Search, right-click, select Properties, and change the startup type to Disabled. You can still search files using File Explorer’s built-in search—it’s just slower.
Delivery Optimization: Rarely benefits individual users. Go to Settings > System > Troubleshoot > Other troubleshooters, scroll down and click Performance troubleshooter. Or manually open Services and disable DoSvc (Delivery Optimization Service).
Cloud Sync Timing: Rather than disabling services entirely, configure them to sync on a schedule. OneDrive, for instance, has settings to pause syncing during working hours, resume after you close work applications, or limit bandwidth during metered connections.
Efficiency Mode: Task Manager includes an Efficiency Mode toggle (in Windows 11). You can set individual background applications to run in Efficiency Mode, which reduces their CPU priority while maintaining functionality. This is less aggressive than disabling services outright.
Finding the Balance
You’re not trying to disable everything—that’s paranoia, not optimization. You’re disabling programs you don’t need and configuring useful ones to consume fewer resources. A cloud sync service syncing once hourly uses a fraction of the resources it consumes syncing constantly.
Storage Optimization That Actually Works
SSD vs HDD: What to Optimize Differently
If your computer shipped with a traditional hard drive (HDD) or is older than 2018, upgrading to an SSD is the single most impactful improvement possible. An SSD is approximately 35 times faster at reading data than an HDD. Real-world benefit: a PC that takes 60 seconds to boot drops to 15-20 seconds with an SSD upgrade.
However, SSDs require different optimization than older mechanical drives.
The Defragmentation Myth
HDDs benefit from defragmentation: data fragments are scattered across the spinning platter, forcing the mechanical read head to hunt for pieces. Defragmentation reorganizes data sequentially, reducing seek time.
SSDs don’t have moving parts. Data location doesn’t matter; SSDs read any location at the same speed. Defragmenting an SSD generates unnecessary writes to memory cells, accelerating wear. Windows automatically handles SSD optimization through the TRIM command, which clears unused blocks and maintains performance. Defragmenting an SSD is actively harmful.
What Actually Helps SSD Performance
-
Maintain Free Space: Keep at least 10% of your SSD empty. When SSDs approach full capacity (less than 5% free), write performance degrades significantly as the controller struggles to find empty blocks.
-
Enable TRIM: Windows enables TRIM by default on modern SSDs. To verify: open Command Prompt as administrator, type
fsutil behavior query DisableDeleteNotify, and press Enter. A return of “0” means TRIM is enabled (good). If it returns “1,” typefsutil behavior set DisableDeleteNotify 0to enable it. -
Update SSD Firmware: SSD manufacturers occasionally release firmware updates improving performance or fixing stability issues. Check your drive manufacturer’s website (Samsung, WD, Crucial, etc.) for updates. Update tools are usually straightforward, and firmware updates take seconds.
-
Use AHCI Mode in BIOS: If your system runs older SATA settings, switching to AHCI mode in BIOS improves SSD performance. This is obscure territory for most users—only pursue this if performance is genuinely problematic.
Free Up Disk Space the Smart Way
When your drive reaches 90% capacity, performance drops noticeably because the operating system can’t quickly find space for temporary files. If you have less than 5% free space, your PC becomes visibly sluggish.
Where the Space Goes
Temporary files, Windows Update installation files, browser cache, Windows Prefetch data, and forgotten large files accumulate silently. On systems not cleaned in 6+ months, you can typically recover 20-40 GB.
Built-in Cleanup: Storage Sense
Windows 11 includes Storage Sense, which automatically cleans temporary files on a schedule you set. Go to Settings > System > Storage and enable Storage Sense. Configure it to:
-
Run monthly (not weekly; once monthly is sufficient)
-
Delete temporary files automatically
-
Empty Recycle Bin after 30 days
-
Avoid deleting Downloads folder (you might need files there)
Enable this and forget it. Storage Sense handles ongoing cleanup without intervention.
Manual Cleanup: Disk Cleanup
For deeper cleanup, use Disk Cleanup. Search “Disk Cleanup” in Windows, select your drive, and check all boxes except Downloads (you’re the judge of what to keep there). Click Clean up system files if offered—this removes older Windows Update installation files, which can be 10-20 GB.
After major Windows updates, run Disk Cleanup specifically for Windows Update cleanup, which removes previous installation media. This often frees 10-20 GB after a feature update.
Temp File Cleanup: Direct Method
For aggressive cleanup, manually clear temporary files. Search “temp” in Windows and open the Temporary Files folder. Select all and delete. Windows won’t allow deletion of files currently in use—it’s impossible to break anything. Some files will show “File in Use” errors; skip these.
Third-Party Cleaners: Cautious Approach
CCleaner is popular, but it’s overkill for most users. It performs the same function as built-in tools while introducing slight risk (if configured too aggressively, it might delete files you need). Use Windows’ built-in tools first. Only resort to third-party cleaners if you’re experienced and willing to research configuration.
Move Data, Not Just Delete It
Rather than delete large files, offload them to external storage. This is especially important for media creators, photographers, and anyone with video files or large project archives.
External Drive Strategy
Purchase a USB 3.1 external drive (affordable: $40-80 for 1-2 TB). Move infrequently accessed files—old photos, completed projects, video archives—to the external drive. Leaving these on your main SSD wastes valuable space and reduces performance.
Cloud Storage Considerations
Services like OneDrive, Google Drive, and Dropbox offer cloud storage, but bandwidth and convenience matter. OneDrive (included with Windows) is convenient for documents and photos accessed regularly. For large files or archives, external drives are faster and cheaper than cloud subscriptions.
Backup Strategy
Offloading files serves double duty: freeing local space and creating backup copies. Store external drives in a separate location (in case of theft or disaster). This is both an optimization and a safety measure.
Memory (RAM) Optimization Without Myths
How RAM Is Really Used
One of the most persistent misconceptions about computer performance is the notion that unused RAM is wasted RAM. In reality, it’s the opposite.
Windows uses available RAM intelligently for caching. When you open a file, Windows stores it in RAM temporarily. When you close the file but RAM remains available, Windows keeps it in cache so reopening that file is instantaneous (reading from RAM is 100,000 times faster than reading from disk). Unused RAM sits idle, providing no benefit. Used RAM for caching provides dramatic speed improvements.
Seeing 80% or even 90% of your RAM “used” is often a sign of excellent operating system management, not a problem.
The Critical Distinction
There’s a difference between RAM actively used by running applications and RAM used for caching. When you see “90% RAM used” but Task Manager shows only 4 GB in actual application usage, the remaining 8 GB is cache—and it’s helping your system perform better.
If an application needs cache space, Windows immediately frees it. This is automatic and invisible; the operating system never prioritizes caching over running programs.
Modern Minimum RAM Recommendations
-
4 GB: Obsolete. Avoid any PC with only 4 GB
-
8 GB: Minimum for basic browsing, email, documents. Adequate for office workers
-
16 GB: Comfortable for gaming, multitasking, photography, video work
-
32 GB: Recommended for video editing, 3D rendering, professional workloads
Most new PC purchases should target 16 GB, the sweet spot between cost and modern software demands.
Reduce RAM Pressure
If you’re experiencing multitasking stutters (your PC freezes momentarily, then continues), you have RAM pressure. Your system is exhausting physical memory and using slow virtual memory (stored on disk).
Browser Tab Management
Web browsers are RAM hogs. A single tab with a complex website (Gmail, Notion, Figma, online banking) consumes 50-300 MB depending on content. With 20 open tabs, your browser might consume 2-4 GB. Modern browsers include memory-saving features:
Chrome Memory Saver: Settings > Performance > Enable Memory Saver. You choose aggressive, balanced, or conservative cleanup. Chrome automatically suspends inactive tabs, releasing their RAM. When you click a suspended tab, it reloads instantly.
Firefox Extensions: Use “Tab Suspender” or similar extensions to achieve the same effect.
Microsoft Edge Efficiency Mode: Built-in to Windows 11; toggle it directly in the browser.
If you frequently have 30+ tabs open, you have a workflow problem, not a technical problem. Browsers aren’t designed to manage dozens of simultaneous pages. Close unused tabs, use bookmarks for later reference, or use a tab management extension.
Memory-Hungry Applications
Some applications are legitimately RAM-intensive. Electron-based applications (Discord, Slack, Figma, VS Code) run a full Chromium browser instance within each app, consuming 200-600 MB each. Running three Electron apps can consume 1-2 GB alone.
Lightweight alternatives exist: Vesktop (lightweight Discord), lighter code editors (Sublime Text vs. VS Code), or native applications. The choice is yours, but understand the resource trade-off.
Virtual Memory (Paging File)
If you frequently experience RAM pressure, Windows uses your SSD as virtual memory (called “paging”). When RAM is full, Windows writes inactive data to disk, freeing RAM. When it’s needed again, Windows reads it back. This is 100-1000 times slower than RAM, causing noticeable stutters.
If you have 8 GB RAM and regularly experience this, upgrading to 16 GB is the correct solution, not tweaking virtual memory settings.
When More RAM Is Actually the Solution
You genuinely need more RAM if:
-
You frequently use creative software (video editing, 3D rendering, photo processing)
-
You run multiple demanding applications simultaneously (browser, IDE, Docker containers, virtual machines)
-
Video games consistently show “Out of Memory” messages
-
Task Manager shows memory at 85%+ and you’re experiencing noticeable stuttering
RAM upgrades are inexpensive and straightforward. Most laptops made after 2015 allow RAM upgrades. Check your device’s service manual or search your model on YouTube for upgrade instructions.
Power Settings & Performance Profiles (Easy Win)
Windows Power Plans Explained
Windows includes multiple power plans balancing performance and energy consumption:
Balanced (Default): Reduces power consumption when idle, boosts performance when needed. Adequate for most users.
High Performance: Keeps your CPU running at maximum frequency constantly. Uses more power (higher electricity bill) but provides consistent responsiveness. Recommended for desktops; not ideal for laptops.
Power Saver: Minimizes power consumption at the cost of responsiveness. Used primarily on older laptops with poor battery life.
Changing power plans is one of the easiest, most effective optimizations available.
Optimize Power Without Killing Battery Life
For Desktops
Desktops on consistent power should use High Performance mode. Go to Settings > System > Power > Power mode and select Best performance. Or right-click the battery icon (if visible) and select High performance.
The downside is negligible: desktops draw power from walls; a few extra watts matters little for users with $1,000+ systems.
For Laptops (Plugged In)
When charging, laptops can safely use High Performance mode. Plug in while working, switch to Balanced when unplugged.
Some laptops include a Performance Slider in battery settings. With this, you can fine-tune: drag toward performance when plugged in, toward efficiency on battery.
For Laptops (On Battery)
Balanced mode is reasonable; Power Saver is only necessary for extended use away from outlets.
Specific Advanced Settings (Optional)
For power users, more granular settings exist. Go to Control Panel > Power Options > Change plan settings > Change advanced power settings. Key settings:
-
Processor power management: Set to 100% minimum when plugged in, 50% on battery
-
USB Selective Suspend: Disable (prevents delays resuming USB devices)
-
PCI Express Link State Power Management: Disable (can cause stutters)
-
Hard disk turn off: Set to “Never” (prevents unnecessary disk spinups on HDDs)
These are advanced; most users needn’t adjust them. Default high performance mode is sufficient.
Graphics & Display Optimization
GPU Settings That Affect Everyday Performance
Most daily computing (browsing, office work, video calls) doesn’t stress your GPU. Graphics card optimizations matter primarily for gaming and creative work. However, a few simple GPU settings improve everyday responsiveness.
NVIDIA Control Panel (if you have an NVIDIA GPU):
-
Right-click your desktop and select NVIDIA Control Panel
-
Select Manage 3D Settings
-
Under Power management mode, select Prefer Maximum Performance (minor power cost, consistent responsiveness)
-
Enable Shader Cache (caches compiled shaders, improving performance)
-
Set Texture filtering quality to High Performance
-
Enable Threaded optimization (allows multi-threaded GPU work)
AMD Radeon Settings (if you have an AMD GPU):
-
Right-click your desktop and select AMD Radeon Settings
-
Click the Gaming tab, then Global Graphics
-
Set Power efficiency to Disabled (for performance)
-
Ensure Shader Cache is enabled
These adjustments provide measurable improvement in frame rates during gaming and smoother performance in GPU-accelerated applications.
Display Settings That Improve Smoothness
Refresh Rate
Your monitor has a refresh rate (Hz): 60 Hz, 144 Hz, 240 Hz, etc. This is the number of times per second the display updates. Higher refresh rates mean smoother motion.
If your monitor supports 144 Hz but Windows defaults to 60 Hz, it’s a missed optimization. Go to Settings > System > Display > Advanced display and set Refresh rate to your monitor’s maximum.
Note: Refresh rate only helps if your GPU can actually output that many frames. A 144 Hz monitor paired with an underpowered GPU won’t benefit.
Variable Refresh Rate (VRR)
Modern gaming monitors support VRR (G-Sync for NVIDIA, FreeSync for AMD). This synchronizes your display refresh rate to your GPU’s frame output, eliminating screen tearing (visual artifacts when frames don’t align).
Go to Settings > System > Display > Graphics settings and enable Variable refresh rate if available.
Dynamic Refresh Rate
Windows 11 includes Dynamic Refresh Rate (DRR), which intelligently switches between high refresh (120 Hz for smooth scrolling) and low refresh (60 Hz for static content) to save battery life on laptops.
If your laptop supports it, enable this feature. It provides smoother scrolling without draining battery as aggressively as always running at 120 Hz.
Optimization for Gamers vs Non-Gamers
For Gamers
Enable Game Mode in Windows (Settings > Gaming > Game Mode). This prioritizes your gaming process and reduces background interruptions.
Configure your GPU as described in Section 6.1. In-game settings (resolution, shadow quality, ray tracing) are more important than system-level GPU tweaks—turn down graphics settings until you achieve your target frame rate.
Ensure your GPU drivers are updated (NVIDIA/AMD websites, not Windows Update).
For Non-Gamers
Ignore most GPU optimization. Your integrated GPU (built into your CPU) handles everything fine. Disabling unnecessary GPU-accelerated features in Windows has minimal impact and isn’t worth the effort.
Network & Internet Performance Tweaks
Fix Slow Internet That Isn’t Actually Your ISP
Sometimes “slow internet” is actually slow local network performance caused by Windows settings, not your ISP.
Disable Delivery Optimization
Windows automatically enables Delivery Optimization, which shares Windows Update downloads with other computers. This conserves Microsoft’s bandwidth but wastes yours.
Go to Settings > System > Troubleshoot > Other troubleshooters and run the Performance troubleshooter, or manually go to Services (search “services.msc”), find DoSvc, right-click, select Disable.
Limit Windows Update Bandwidth
Windows can consume significant bandwidth downloading updates in the background. Go to Settings > Update & Security > Windows Update > Advanced options > Delivery optimization.
Enable Limit the percentage of bandwidth used for downloading updates in the background and set it to 10%. This prevents Windows from aggressively consuming your connection.
Disable Auto-Updates for Third-Party Software
Adobe, Chrome, Java, and countless other applications auto-update in the background. Disable these automatic updates and manually update once monthly instead.
Go to the application’s settings, find the update option, and disable automatic updates.
Wi-Fi & Ethernet Optimization
Ethernet Takes Priority
If your PC is plugged in via Ethernet and also connected to Wi-Fi, Windows should prefer Ethernet (faster, more stable). Usually this happens automatically, but if Wi-Fi keeps interfering:
Search and open Network Connections. Right-click your active network, select Properties, then IPv4 Properties > Advanced. Under Metric, set Ethernet to 5 and Wi-Fi to 10. Ethernet now takes absolute priority.
Wi-Fi Optimization (Limited Options)
Few Wi-Fi optimization options exist at the PC level. The issue is usually environmental:
-
Move closer to your router
-
Reduce interference (move away from cordless phones, microwaves)
-
Update your router’s firmware
-
Use 5 GHz Wi-Fi instead of 2.4 GHz (faster, shorter range)
From a PC perspective, updating network drivers helps minimally. Check your computer manufacturer’s support page for network driver updates.
Router-Level Improvements
Restart your router monthly. Go into your router settings (usually 192.168.1.1 or 192.168.0.1 in a browser) and ensure you’re running the latest firmware. Forget old networks you don’t use anymore—fewer saved networks reduce Wi-Fi scanning overhead.
Security Optimization (Speed + Safety)
How Malware and Adware Kill Performance
Unlike myths about registry corruption or fragmentation, malware genuinely and severely degrades performance.
Cryptominers (malware designed to use your CPU for cryptocurrency mining) consume 50-100% of CPU resources. Spyware consumes RAM, running background processes. Adware injects ads into your browser, consuming bandwidth and CPU.
Recognizing Malware-Induced Slowness
Malware slowness has specific signatures:
-
CPU usage spikes to 100% even when you’re not running demanding programs
-
Battery drains noticeably faster than normal
-
Fans run constantly, PC is hot
-
Unexpected slowdown accompanied by unusual network activity
-
Pop-ups appear frequently (adware)
If your PC suddenly slowed despite no software changes, malware is a legitimate suspect.
Checking for Infections
Use Windows Defender (built-in antivirus, sufficient for most users). Go to Settings > Privacy & Security > Virus & threat protection and run a Full scan. Let it complete; this takes 30-60 minutes.
If Defender finds nothing but performance problems persist, try Malwarebytes (free version provides scanning, paid version provides real-time protection).
Smart Security Without Overloading Your PC
Built-in Microsoft Defender Is Sufficient
Microsoft Defender is lightweight (75-100 MB RAM), effective (detects 99%+ of threats), and built-in. No installation required, no additional cost.
Third-party antivirus software (Norton, McAfee, Kaspersky) provides more features (VPN, password managers, etc.) but consumes significantly more resources (300-700 MB RAM).
The Real-time Protection Compromise
Real-time protection watches every file you access, protecting you from malware. But constant scanning uses CPU resources.
For most users, enabling real-time protection is necessary and the performance cost is negligible. Only disable it if you’re running CPU-intensive work (video rendering, 3D modeling) and you’re willing to re-enable it afterward.
Lightweight Antivirus Alternatives (if you really need non-Microsoft)
-
Avast Free Antivirus: Lightweight, fast scans (5 minutes for full scans), excellent detection
-
AVG Antivirus: Similar to Avast, owned by same company
-
Avira Free Antivirus: Lightweight, minimal impact
All are significantly lighter than Norton or McAfee.
System Updates & Driver Optimization
Why Updates Improve Performance (Not Just Security)
Windows Updates and driver updates often include performance improvements, not just security patches. Updates fix inefficient code, improve hardware utilization, and optimize for newer hardware.
Delaying updates to avoid system disruption is understandable but counterproductive. You’re sacrificing performance and security for short-term stability.
Windows Updates: Enable automatic updates. Go to Settings > Update & Security > Windows Update and ensure automatic download and install is enabled.
Driver Updates: Outdated graphics drivers particularly harm gaming performance. NVIDIA and AMD release driver updates monthly, sometimes with 5-20% performance improvements for specific games.
Check your GPU manufacturer’s website monthly for driver updates, or enable automatic driver updates in their control panel software.
Safe Driver Update Practices
Use Official Sources Only
Download drivers directly from the manufacturer’s website (NVIDIA.com, AMD.com, manufacturer support pages). Never use third-party driver update software—these often bundle adware and sometimes install incompatible drivers.
Update Critical Drivers, Ignore Others
Graphics drivers: Update monthly
Chipset drivers: Update quarterly
Ethernet/Wi-Fi drivers: Update if experiencing connectivity issues
Audio drivers: Update if experiencing audio problems
Touchpad drivers: Update if experiencing input lag
Don’t obsess over updating every driver. Windows Update handles many driver updates automatically, which is fine.
BIOS/Firmware Updates (Advanced, Optional)
BIOS updates are delicate—failed updates can brick your PC. Only update BIOS if:
-
You’re experiencing specific compatibility issues documented by the manufacturer
-
A performance improvement is listed in the release notes
-
You’ve read the update procedure carefully
Always back up your data before BIOS updates. This is genuinely risky if something goes wrong.
Hardware Upgrades That Give the Biggest Boost
Best Value Upgrades This Year
If your system is genuinely slow and software optimization hasn’t helped sufficiently, hardware upgrades are the answer.
SSD Upgrade (Highest Impact)
If you have a traditional hard drive (HDD), upgrading to an SSD is the single most effective upgrade. An NVMe SSD (the fastest type) costs $40-80 for 512 GB and transforms performance:
-
Boot time: 60 seconds → 15 seconds
-
Application launch: 10 seconds → 2 seconds
-
File operations: Dramatically faster
This is a no-brainer upgrade for any system with an HDD.
RAM Upgrade (Second Highest Impact)
If you have 8 GB RAM and experience constant multitasking stuttering, upgrading to 16 GB costs $30-50 and eliminates virtual memory pressure.
Check your system’s maximum supported RAM (usually 16, 32, or 64 GB depending on age and CPU). RAM upgrades are straightforward: open your PC or laptop (look up instructions on YouTube for your specific model), locate RAM slots, and install new modules.
Cooling Improvements (Surprising Impact)
Dusty fans and blocked vents cause thermal throttling: your CPU and GPU automatically reduce speed to prevent overheating. Cleaning your system thoroughly (compressed air, removing dust from heatsinks) improves cooling and prevents throttling.
Your PC may automatically perform better after cleaning—not because you optimized software, but because it’s now running at full speed instead of throttled.
Upgrades That Rarely Make Sense
CPU Upgrade: Modern CPUs are fast enough for gaming and productivity. Upgrading from a 5-year-old CPU to a new one provides improvement, but:
-
CPU upgrades require motherboard replacement (expensive)
-
Most tasks aren’t CPU-bound; RAM or SSD is the bottleneck instead
-
Diminishing returns: a new CPU provides 20% improvement, not 2x
Only consider CPU upgrades if benchmarking confirms CPU bottlenecking (CPU at 100% while GPU idles). For most users, SSD and RAM upgrades are better investments.
Monitor/Display Upgrade: Doesn’t improve performance; only improves your visual experience. Nice, but not “optimization.”
Keyboard/Mouse: Same as monitor—quality-of-life improvement, not performance.
Long-Term PC Optimization Habits
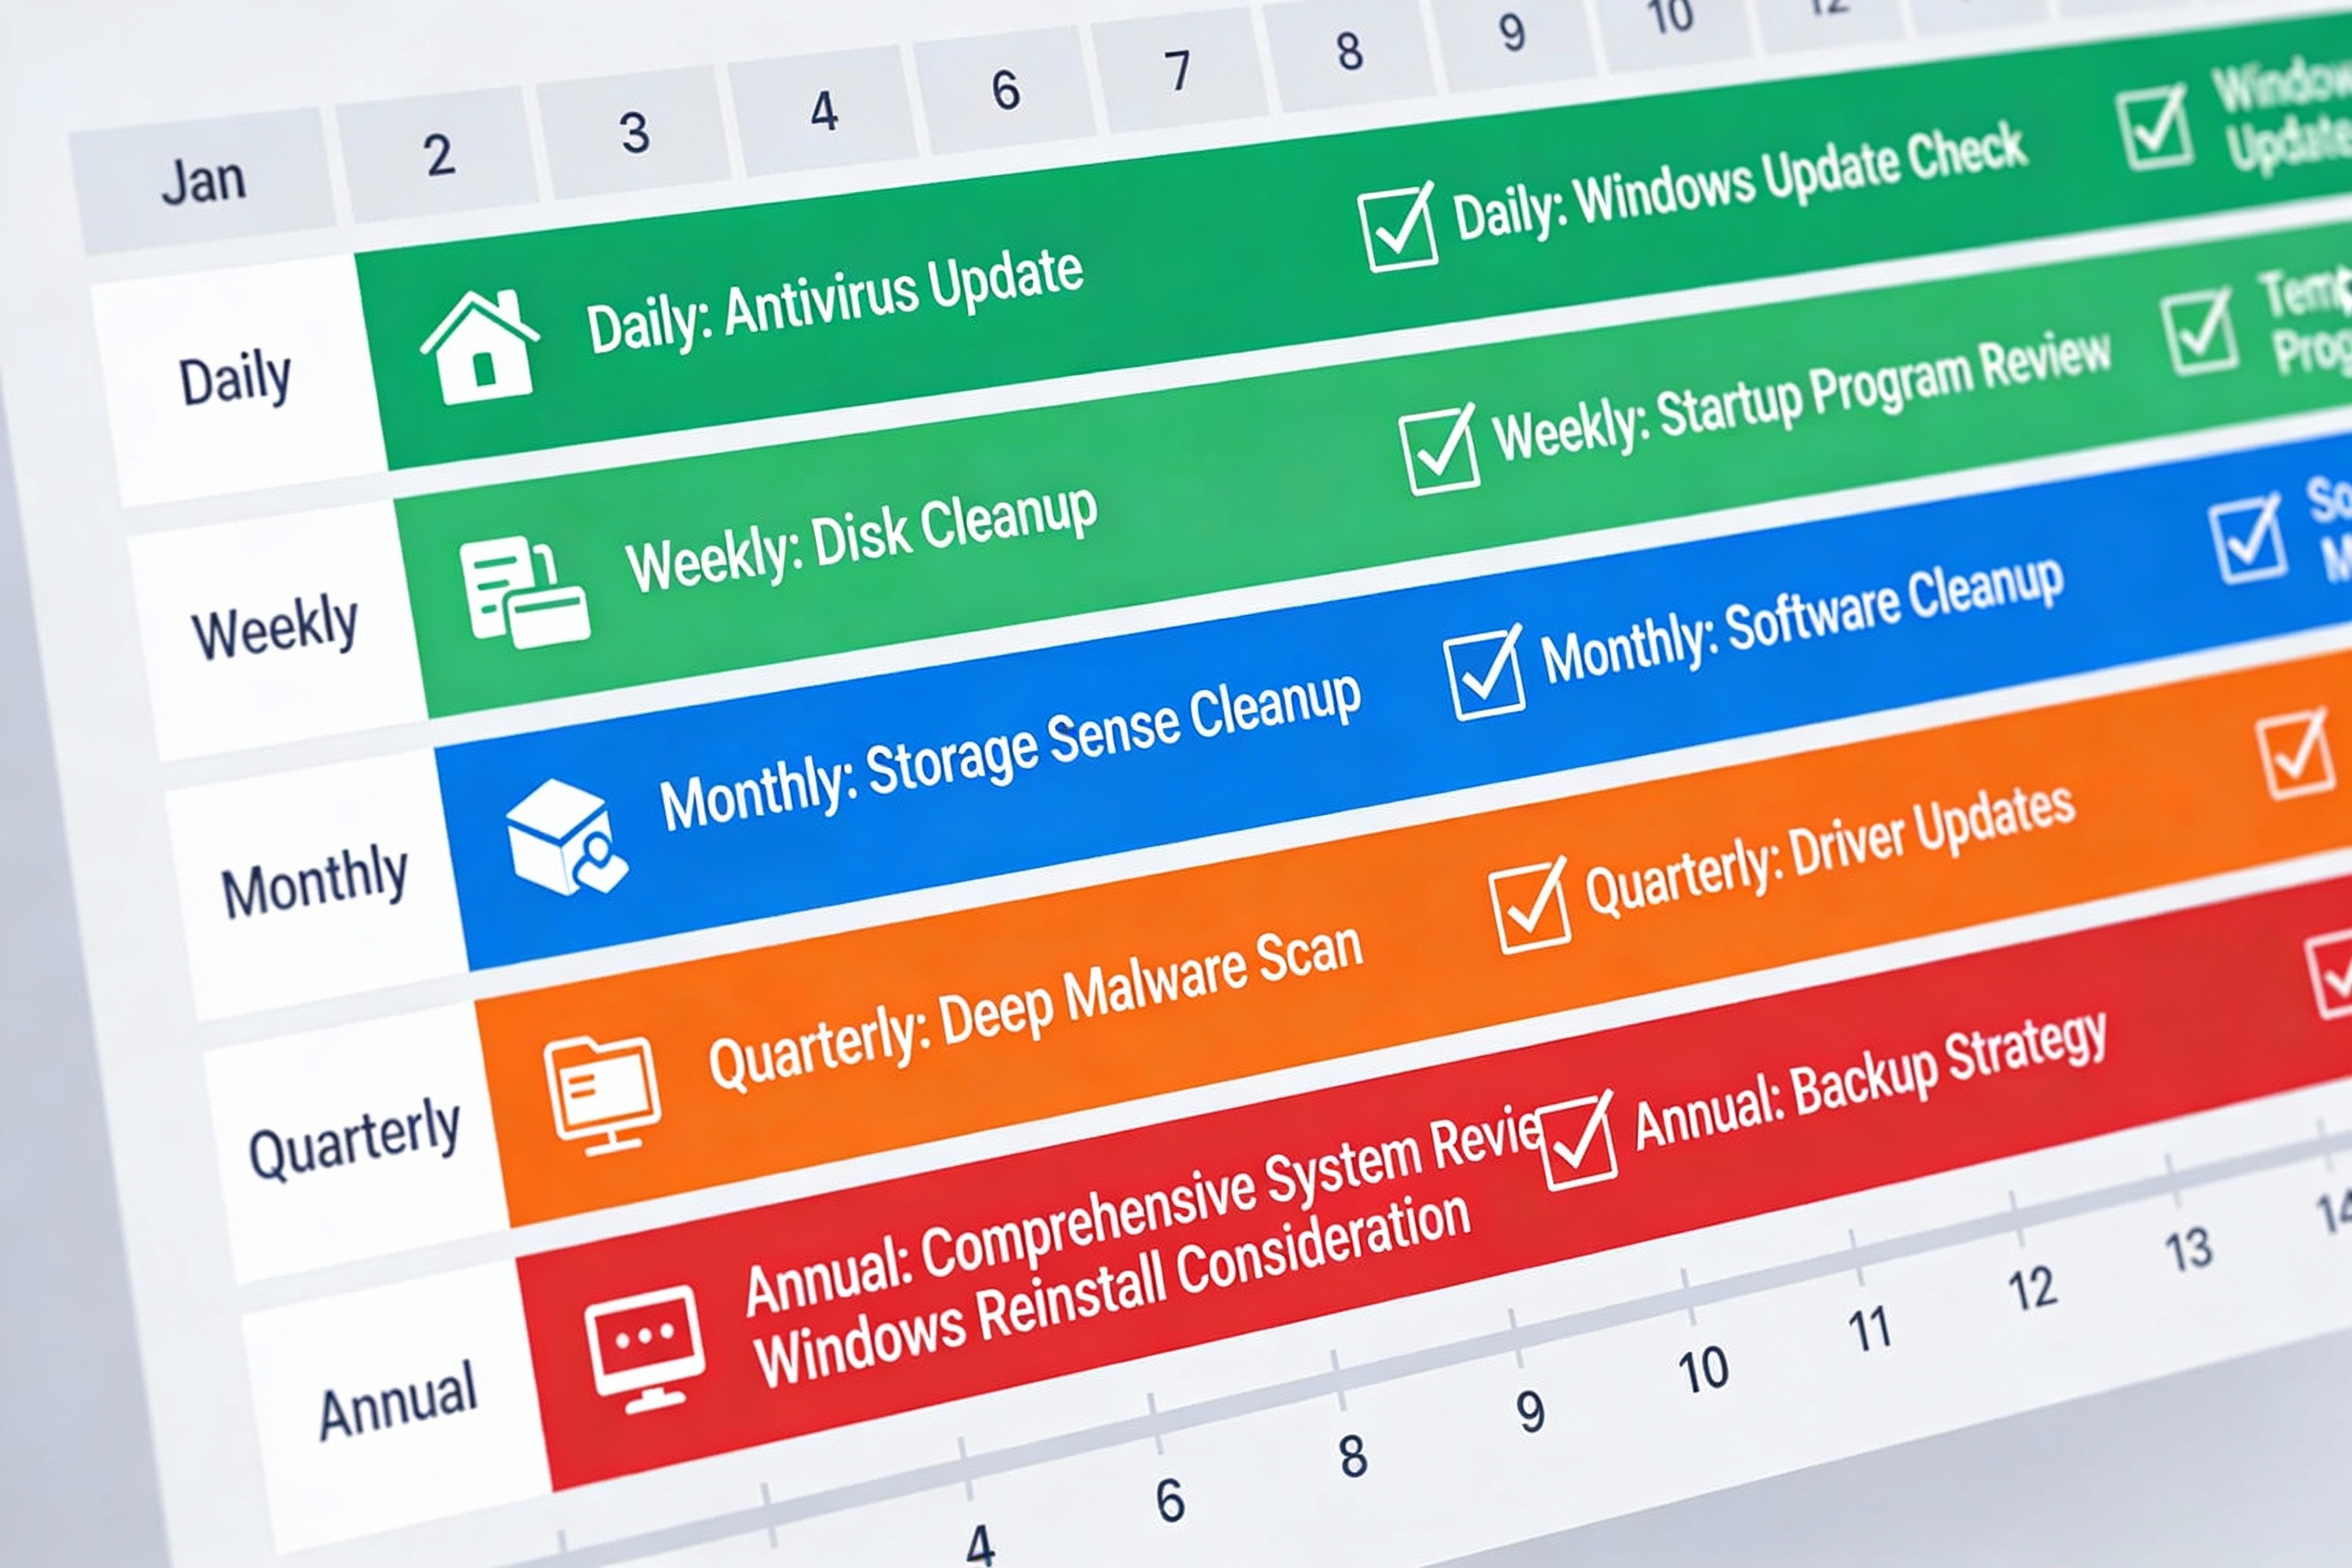
Monthly Maintenance Checklist (10 Minutes)
-
Open Task Manager (Ctrl+Shift+Esc) and review the Startup tab. Disable any unnecessary programs you’ve installed recently
-
Run Disk Cleanup if available, or let Storage Sense handle it automatically
-
Restart your computer (clearing temporary caches, resetting memory)
-
Dust your PC vents and fans (takes 2 minutes with compressed air)
Quarterly Deep Maintenance (30 Minutes)
-
Uninstall software you no longer use (Settings > Apps > Installed Apps)
-
Review antivirus scan results; ensure no infections
-
Check disk space; ensure you have at least 10% free
-
Update critical drivers (GPU, chipset)
-
Clean your keyboard and monitor
Annual Comprehensive Review (1-2 Hours)
-
Assess your hardware: Do you still have an HDD? Does your RAM feel insufficient? Are CPU temperatures normal?
-
Reinstall Windows if it’s been 3+ years (cleanest option for eliminating accumulated junk)
-
Review and organize your file system; move infrequently accessed files to external storage
-
Update your backup strategy if needed
Habits That Keep PCs Fast for Years
-
Software Discipline: Before installing software, ask: “Do I really need this? Is there a lightweight alternative?” Fewer installations mean fewer background services.
-
Uninstall Immediately: When you stop using software, uninstall it immediately rather than leaving it for later. This prevents accumulation of unused programs.
-
Restart Regularly: Restarting clears temporary caches and resets memory. Restart at least monthly, more if you run heavy workloads.
-
Monitor Temperatures: Keep your PC running cool. Overheating causes throttling and long-term hardware damage. Use HWiNFO to monitor CPU and GPU temperatures; they should stay below 80°C during heavy use.
-
Update Consistently: Don’t delay Windows updates. Schedule updates during hours you’re not working (lunch, after hours). An updated system is a faster, more secure system.
Common PC Optimization Myths (Debunked)
Myth 1: “Registry Cleaners Boost Speed”
Reality: Registry entries are tiny (bytes each). Even removing thousands won’t improve performance. Windows doesn’t slow down because you have unused registry entries for programs you uninstalled five years ago. The registry is gigabytes in size; a few thousand obsolete entries are negligible.
Worse, aggressive registry cleaners can delete entries necessary for installed programs to function, causing crashes and instability.
What Actually Works: Simply uninstalling programs you don’t use is sufficient. The few lingering registry entries cause zero problems.
Myth 2: “Task Killers Improve Performance”
Reality: Task killers force Windows to close background processes and clear cache. But this backfires: Windows immediately reopens essential services (they respawn automatically), and closing cached data means it must reload from disk, which is slower.
Worse, frequently killing tasks consumes more CPU and battery power than allowing them to run naturally. Modern Windows intelligently manages background processes; human intervention with task killers is unnecessary and counterproductive.
What Actually Works: Let Windows manage itself. It’s genuinely good at this. Disable startup programs instead—that’s prevention, not reactive killing.
Myth 3: “More Cleaning Software Equals Faster PC”
Reality: Using five cleanup tools compounds problems without benefits. They perform overlapping functions, consume resources themselves, and sometimes interfere with each other.
Worse, aggressive tools occasionally delete files they shouldn’t, causing stability issues.
What Actually Works: Windows’ built-in tools (Storage Sense, Disk Cleanup) are sufficient for 99% of users. They’re safe, effective, and zero-cost. Using third-party tools adds risk with no additional benefit.
Myth 4: “Disabling Visual Effects Dramatically Improves Performance”
Reality: Modern GPUs handle visual effects (window animations, transparency) with minimal effort. Disabling animations might theoretically save 1-2% CPU, but you won’t notice the improvement.
The tradeoff: Windows becomes visually harsh and less intuitive.
What Actually Works: Leave visual effects enabled. If performance is genuinely problematic, the issue is elsewhere (startup programs, insufficient RAM, malware). Fixing the root cause is more effective than disabling effects.
Conclusion
PC optimization isn’t complicated. The highest-impact improvements are simple:
-
Disable unnecessary startup programs (reduces boot time by 30-50%)
-
Remove bloatware and unused software (frees resources, storage)
-
Free up disk space to at least 10% (improves I/O performance)
-
Enable appropriate power settings (consistent responsiveness)
-
Ensure adequate RAM for your workload (eliminates stuttering)
-
Update drivers and Windows (bug fixes, performance improvements)
These actions cost nothing, take 1-2 hours, and deliver measurable improvement for the majority of slow PCs. They’re maintenance, not extreme optimization.
Consistency beats dramatic fixes. A PC that’s optimized once but neglected afterward will slow down again. One that’s maintained monthly stays fast indefinitely.
Finally, avoid the scam optimization software industry entirely. Windows includes everything you need. Free third-party tools like Malwarebytes, HWiNFO, and Process Explorer are helpful for advanced troubleshooting, but avoid any software promising “amazing speed boosts.” Those are marketing fantasies.
Your PC isn’t aging because hardware fails. It’s slowing because of clutter, background processes, and poor configuration. All of these are reversible. Optimize, maintain, and your computer will remain responsive for years.
Quick Optimization Checklist
-
Disable high-impact startup programs (Task Manager > Startup tab)
-
Uninstall unused bloatware (Settings > Apps > Installed Apps)
-
Enable Storage Sense (Settings > System > Storage > Storage Sense)
-
Verify SSD TRIM is enabled (Command:
fsutil behavior query DisableDeleteNotify) -
Switch to High Performance power mode (Settings > System > Power)
-
Set display refresh rate to maximum (Settings > System > Display > Advanced display)
-
Enable GPU power optimization (GPU Control Panel)
-
Run antivirus full scan (Windows Security or Defender)
-
Update graphics drivers (NVIDIA/AMD official websites)
-
Restart your computer
-
Monitor Task Manager to ensure background processes are reasonable
FAQs
Why is my PC slow even with an SSD?
SSDs don’t guarantee speed if other components bottleneck. Common causes: insufficient RAM (causing virtual memory usage), outdated drivers, background malware, Windows Search indexing unnecessarily, disabled TRIM command, or improper BIOS settings (AHCI mode disabled, SSD configured as IDE). First, upgrade to 16 GB RAM if you have 8 GB and experience stuttering. Then update drivers, verify TRIM is enabled, and run a malware scan.
How often should I optimize my PC?
Enable automatic optimization (Storage Sense set to monthly) and do nothing else. If you’re technically inclined, review your Startup tab and Task Manager monthly. Deep maintenance (uninstalling software, updating drivers) quarterly is sufficient. Annual reinstallation of Windows is optional but recommended every 3-4 years if using the same installation for many years.
Can optimization damage my system?
If you stick to built-in Windows tools (Task Manager, Storage Sense, Disk Cleanup, Settings), no. Uninstalling software is safe. Disabling startup programs is safe. Third-party tools carry risk, particularly aggressive registry cleaners and task killers. Avoid registry editing unless you know specifically what you’re editing. BIOS updates carry the highest risk.
Is it worth upgrading to an SSD if I have an HDD?
Absolutely. This is the single most impactful upgrade available. Boot time typically drops from 60+ seconds to 15-20 seconds. Application launch time improves dramatically. It’s inexpensive ($40-100 for 512 GB) and transformative for user experience.
Should I use a password manager on a slow PC?
Password managers consume minimal resources. If your PC is already slow, password managers aren’t the problem. Slow performance is caused by startup programs, insufficient RAM, or malware—not security software.